This note demonstrates how to create and deploy an MDP, and how to control it, using both Spring’s inbuilt component management mechanisms, and JMX.
Scenario
We have a number of JMS listeners in our application. Having ported our hardware to a grid of virtual machines, we want the feature to switch-on and switch-off the listeners on the VMs, and re-allocate the listeners to VMs across the grid on-demand, to make best use of the resources.Scope
This note just deals briefly with configuring the MDP, and switching it on and off.Concepts
– What is an MDP? – MDP stands for Message Driven Pojo. In the EJB world we have MDBs (Message Driven Beans). These are standard JEE components which are configured on a server and which act as a Message Listener. Spring provides MDPs as an answer to MDBs. Some helpful links are:- MDB http://java.sun.com/j2ee/tutorial/1_3-fcs/doc/EJBConcepts5.html
- MDP http://static.springsource.org/spring/docs/2.5.x/reference/jms.html http://static.springsource.org/spring/docs/2.5.x/reference/jms.html#jms-asynchronousMessageReception
- JMX http://java.sun.com/j2se/1.5.0/docs/guide/jmx/ http://java.sun.com/j2se/1.5.0/docs/guide/jmx/overview/JMXoverviewTOC.html http://tomcat.apache.org/tomcat-5.5-doc/monitoring.html
- Spring JMX http://static.springsource.org/spring/docs/2.5.x/reference/jmx.html
Creating a simple Spring MDP component, and controlling it using the Spring container provided “start” and “stop” methods
MDP Spring configuration
Extract from the Spring Config XML file spring_context_jms.xml<!-- Destination configuration -->
<bean id="sample_queue"
class="org.apache.activemq.command.ActiveMQQueue"
autowire="constructor">
<constructor-arg>
<value>SAMPLE.QUEUE</value>
</constructor-arg>
</bean>
<!-- Message Listener Container configuration -->
<bean id="sample_jmsContainer"
class="org.springframework.jms.listener.DefaultMessageListenerContainer102">
<property name="connectionFactory"
ref="activeMqQueueConnectionFactory" />
<property name="destination" ref=" sample_queue" />
<property name="messageListener"
ref="sample_messageListener" />
</bean>
<!-- Message Driven POJO (MDP) configuration -->
<bean id="sample_messageListener"
class="jmsexample.ExampleListener">
<property name="listener" ref="sample_jmsContainer" />
</bean>
Code language: HTML, XML (xml)Configuring Spring components in a Web application in Tomcat
The MDPs are deployed in a Web application as JMSWebApplication.war. Follows is an extract from the web.xml<display-name>JMSWebApplication</display-name>
<welcome-file-list>
<welcome-file>index.jsp</welcome-file>
<welcome-file>default.html</welcome-file>
</welcome-file-list>
<context-param>
<param-name>contextConfigLocation</param-name>
<param-value>classpath:spring_context.xml</param-value>
</context-param>
<listener>
<description>Context Loader Listener</description>
<listener-class>
org.springframework.web.context.ContextLoaderListener
</listener-class>
</listener>
Code language: HTML, XML (xml)Getting a handle to the Spring’s “Listener Container” component and calling start and stop on it (Non-JMX)
Follows is a relevant extract from the client jsp:<%@page import="org.springframework.beans.factory.BeanFactory,org.springframework.context.ApplicationContext,org.springframework.context.support.ClassPathXmlApplicationContext,org.springframework.jms.listener.DefaultMessageListenerContainer102,org.springframework.web.context.WebApplicationContext,org.springframework.web.context.support.WebApplicationContextUtils"%>
ServletContext context = application
.getContext("/JMSWebApplication");
WebApplicationContext wac = WebApplicationContextUtils
.getRequiredWebApplicationContext(context);
DefaultMessageListenerContainer102 listener = (DefaultMessageListenerContainer102) wac
.getBean("sample_jmsContainer");
listener.stop();
//listener.start();
Code language: Java (java)Exposing and Controlling the Listener component using Spring JMX
This involves configuring Spring JMX. Since this is deployed in Tomcat, we will enable JMX in Tomcat and connect to it using jconsole to control this component.Configuring Spring JMX (server/container), and Exposing the component in JMX
<bean id="exporter"
		class="org.springframework.jmx.export.MBeanExporter">
		<property name="beans">
			<map>
				<entry key="bean:name=sample_listener_jmx"
					value-ref=" sample_messageListener" />
			</map>
		</property>
	</bean>
Code language: HTML, XML (xml)
Arguments to Tomcat to enable JMX
Provide these (self-explanatory) arguments to the JVM while starting up TomcatCode language: HTML, XML (xml)-Dcom.sun.management.jmxremote.port=10088 \ -Dcom.sun.management.jmxremote.ssl=false \ -Dcom.sun.management.jmxremote.authenticate=false \
Code skeleton of jmsexample. ExampleListener
(Note the “startListener” and “stopListener” methods, and use of the “DefaultMessageListenerContainer102” class.)package jmsexample;
< imports come here ... >
public class ExampleListener implements MessageListener {
private DefaultMessageListenerContainer102 listener;
< other variables here ... >
public void onMessage(Message message) {
< Business Logic here ... >
}
@ManagedAttribute(description = "Starts the Listener", currencyTimeLimit = 15)
public void startListener() {
System.out.println("Starting listener");
getListener().start();
System.out.println("listener started " + getListener().isRunning());
}
@ManagedAttribute(description = "Stops the Listener", currencyTimeLimit = 15)
public void stopListener() {
System.out.println("Stopping listener");
getListener().stop();
System.out.println("listener stopped " + getListener().isRunning());
}
public DefaultMessageListenerContainer102 getListener() {
return listener;
}
public void setListener(DefaultMessageListenerContainer102 listener) {
this.listener = listener;
}
< other methods here ...>
}
Code language: Java (java)View in jconsole of controlling the component
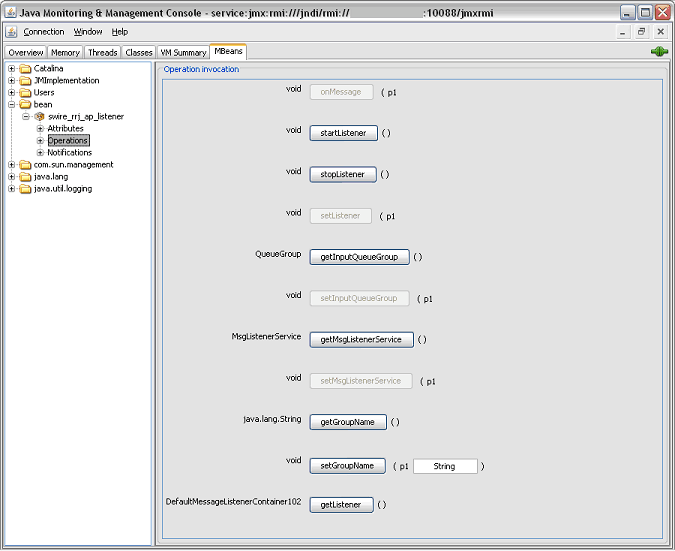
(Note the “startListener” and “stopListener” methods exposed) The remote connection string here, for example, is service:jmx:rmi:///jndi/rmi://localhost:10088/jmxrmi
A simple java based rmi client using Tomcat JMX to control the components
Client code snippet and configuration
String address =
         "service:jmx:rmi:///jndi/rmi://localhost:10088/jmxrmi";
	JMXServiceURL serviceURL = new JMXServiceURL(address);
	Map<String, Object> environment = null;
	JMXConnector connector = JMXConnectorFactory.connect(serviceURL,
				environment);
	MBeanServerConnection mBeanConnection = connector
				.getMBeanServerConnection();

	ObjectName exampleServiceName = ObjectName
				.getInstance("bean:name=sample_listener_jmx");

mBeanConnection.invoke(exampleServiceName, "startListener", null, null);
//mBeanConnection.invoke(exampleServiceName, "stopListener", null, null);
Code language: Java (java)


Viral,
Could you please attache the total source code of this tutorial please.
Thanks,
Naveen
This is a blatant plagarization of this site: http://java.dzone.com/articles/configuring-mdp-and
Give credit where credit is due!
Hi, The article is from the same author :) He published the article first on this site and then on dzone. The citation is done on DZone. Check the end of the article on dzone. ^_^