In this simple tutorial we will see how to implement multiple file upload in a Spring 3 MVC based application. The requirement is simple. We have a form which displays file input component. User selects a file and upload it. Also its possible to add more file input components using Add button. Once the files are selected and uploaded, the file names are displayed on success page.
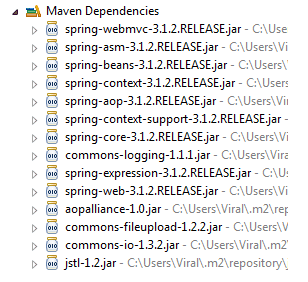
1. Maven Dependencies / Required JAR files
If you using Maven in your project for dependency management, you’ll need to add dependencies for Apache Common File upload and Apache Common IO libraries. The spring’s CommonsMultipartResolver class internal uses these library to handle uploaded content. Add following dependencies in your maven based project to add File upload feature.
<dependencies>
   <!-- Spring 3 MVC  -->
   <dependency>
      <groupId>org.springframework</groupId>
      <artifactId>spring-webmvc</artifactId>
      <version>3.1.2.RELEASE</version>
   </dependency>
   <!-- Apache Commons file upload  -->
   <dependency>
      <groupId>commons-fileupload</groupId>
      <artifactId>commons-fileupload</artifactId>
      <version>1.2.2</version>
   </dependency>
   <!-- Apache Commons IO -->
   <dependency>
      <groupId>org.apache.commons</groupId>
      <artifactId>commons-io</artifactId>
      <version>1.3.2</version>
   </dependency>
   <!-- JSTL for c: tag -->
   <dependency>
      <groupId>jstl</groupId>
      <artifactId>jstl</artifactId>
      <version>1.2</version>
   </dependency>
</dependencies>Code language: HTML, XML (xml)
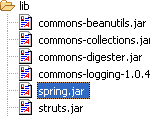
If you have a simple web application, add following JAR files in WEB-INF/lib folder. You can download all these JARs with source code at the end of this tutorial.
2. Model – Form Object
Create a Java bean which acts as Model/Form object for our Spring application. This bean contains a List of org.springframework.web.multipart.MultipartFile objects. Spring framework provides a useful class MultipartFile which can be used to fetch the file content of uploaded file. Apart from its content, the MultipartFile object also gives you other useful information such as filename, file size etc.
FileUploadForm.java
package net.viralpatel.spring3.form;

import java.util.List;

import org.springframework.web.multipart.MultipartFile;

public class FileUploadForm {

    private List < MultipartFile > files;

    //Getter and setter methods
}Code language: Java (java)
3. Controller – Spring Controller
Create a Spring 3 MVC based controller which handles file upload. There are two methods in this controller:
displayForm– Is a used to show input form to user. It simply forwards to the page file_upload_form.jspsave– Fetches the form using@ModelAttributeannotation and get the File content from it. It creates a list of filenames of files being uploaded and pass this list to success page.
FileUploadController.java
package net.viralpatel.spring3.controller;

import java.util.ArrayList;
import java.util.List;

import net.viralpatel.spring3.form.FileUploadForm;

import org.springframework.stereotype.Controller;
import org.springframework.ui.Model;
import org.springframework.web.bind.annotation.ModelAttribute;
import org.springframework.web.bind.annotation.RequestMapping;
import org.springframework.web.bind.annotation.RequestMethod;
import org.springframework.web.multipart.MultipartFile;

@Controller
public class FileUploadController {

	@RequestMapping(value = "/show", method = RequestMethod.GET)
	public String displayForm() {
		return "file_upload_form";
	}

	@RequestMapping(value = "/save", method = RequestMethod.POST)
	public String save(
			@ModelAttribute("uploadForm") FileUploadForm uploadForm,
					Model map) {

		List<MultipartFile> files = uploadForm.getFiles();

		List<String> fileNames = new ArrayList<String>();

		if(null != files && files.size() > 0) {
			for (MultipartFile multipartFile : files) {

				String fileName = multipartFile.getOriginalFilename();
				fileNames.add(fileName);
				//Handle file content - multipartFile.getInputStream()

			}
		}

		map.addAttribute("files", fileNames);
		return "file_upload_success";
	}
}Code language: Java (java)
4. View – JSP views
Now create the view pages for this application. We will need two JSPs, one to display file upload form and another to show result on successful upload. The file_upload_form.jsp displays a form with file input. Apart from this we have added small jquery snippet onclick of Add button. This will add a new file input component at the end of form. This allows user to upload as many files as they want (subjected to file size limit ofcourse). Note that we have set enctype=”multipart/form-data” attribute of our <form> tag.
file_upload_form.jsp
<%@taglib uri="http://www.springframework.org/tags/form" prefix="form"%>
<html>
<head>
	<title>Spring MVC Multiple File Upload</title>
<script
src="http://ajax.googleapis.com/ajax/libs/jquery/1.8.2/jquery.min.js"></script>
<script>
$(document).ready(function() {
	//add more file components if Add is clicked
	$('#addFile').click(function() {
		var fileIndex = $('#fileTable tr').children().length - 1;
		$('#fileTable').append(
				'<tr><td>'+
				'	<input type="file" name="files['+ fileIndex +']" />'+
				'</td></tr>');
	});

});
</script>
</head>
<body>
<h1>Spring Multiple File Upload example</h1>

<form:form method="post" action="save.html"
		modelAttribute="uploadForm" enctype="multipart/form-data">

	<p>Select files to upload. Press Add button to add more file inputs.</p>

	<input id="addFile" type="button" value="Add File" />
	<table id="fileTable">
		<tr>
			<td><input name="files[0]" type="file" /></td>
		</tr>
		<tr>
			<td><input name="files[1]" type="file" /></td>
		</tr>
	</table>
	<br/><input type="submit" value="Upload" />
</form:form>
</body>
</html>Code language: HTML, XML (xml)
Note that we defined the file input name as files[0], files[1] etc. This will map the submitted files to the List object correctly. I would suggest you to go through this tutorial to understand how Spring maps multiple entries from form to bean: Multiple Row Form Submit using List of Beans Second view page is to display filename of uploaded file. It simply loops through filename list and display the names.
file_upload_success.jsp
<%@taglib uri="http://java.sun.com/jsp/jstl/core" prefix="c"%>
<html>
<head>
	<title>Spring MVC Multiple File Upload</title>
</head>
<body>
	<h1>Spring Multiple File Upload example</h1>
	<p>Following files are uploaded successfully.</p>
	<ol>
		<c:forEach items="${files}" var="file">
			<li>${file}</li>
		</c:forEach>
	</ol>
</body>
</html>Code language: HTML, XML (xml)
5. Spring Configuration
In Spring configuration (spring-servlet.xml) we define several important configurations. Note how we defined bean multipartResolver. This will make sure Spring handles the file upload correctly using CommonsMultipartResolver class.
spring-servlet.xml
<?xml  version="1.0" encoding="UTF-8"?>
<beans xmlns="http://www.springframework.org/schema/beans"
	xmlns:xsi="http://www.w3.org/2001/XMLSchema-instance"
	xmlns:context="http://www.springframework.org/schema/context"
	xmlns:mvc="http://www.springframework.org/schema/mvc"
	xsi:schemaLocation="http://www.springframework.org/schema/beans http://www.springframework.org/schema/beans/spring-beans.xsd http://www.springframework.org/schema/context http://www.springframework.org/schema/context/spring-context.xsd http://www.springframework.org/schema/mvc http://www.springframework.org/schema/mvc/spring-mvc.xsd">

	<context:annotation-config />
	<context:component-scan base-package="net.viralpatel.spring3.controller"/>

 <bean id="multipartResolver"
  class="org.springframework.web.multipart.commons.CommonsMultipartResolver"/>

  <bean id="jspViewResolver"
	class="org.springframework.web.servlet.view.InternalResourceViewResolver">
		<property name="viewClass"
			value="org.springframework.web.servlet.view.JstlView" />
		<property name="prefix" value="/WEB-INF/jsp/" />
		<property name="suffix" value=".jsp" />
  </bean>
</beans>Code language: HTML, XML (xml)
6. Output
Execute the project in Eclipse. Open following URL in browser to see file upload form.
URL: http://localhost:8080/Spring3MVC_Multiple_File_Upload_example/show.html
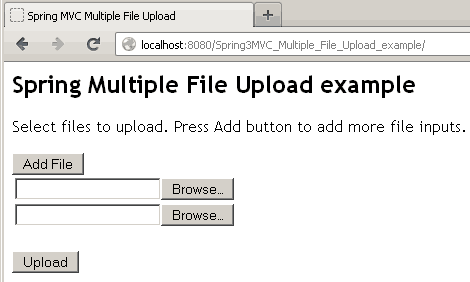
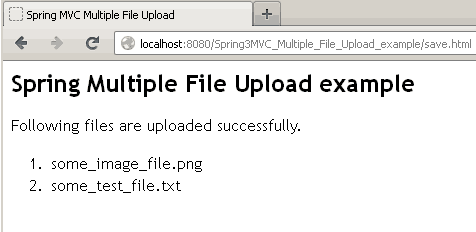
Select files through file dialog and press Upload button to upload. Following page will displayed with list of files being uploaded.
We have added a small JavaScript snippet for Add button. This will add more file upload components to the page. Use this if you want to upload more files.
Download Source Code
SpringMVC_Multi_File_Upload_example.zip (3.6 MB)

Hi Viral! A great tutorial! How do we restrict the file types being uploaded. Use case being i want the user to upload only .pdf file or .xls files.
You can use a validator, first register your validator
Then you apply that validator to uploaded file
I hope this helps
Hi Creg,
In your reply said :
First register your validator, then apply, can you please show us where to register and where to apply, and where to create the validator, do we need a configuration somewhere ?
Thanks
Hello there, nice tutorial. Just one warn, when I run your example after download it from here and I get the following exception stacktrace:
You shoul change the line of code:
for this one:
doing so, it wont duplicate the same last index when select the “Add File” button
Regards!
Very good tutorial, thanks.
this is very good to learn java, keep exist with this site such we can to be java expert hahahahaha., thanks viralpatel.,
Thanks for this example. Its easy to understand, I have downloaded the source code, but i am not able to run the project.
http://localhost:9090/SpringMVC_Multi_File_Upload_example/
i am getting 404 error. what is missing?.
Spring Multiple File Upload example
Following files are uploaded successfully.
CreateDB.sql
Where is place uploaded files ?
I want to using ajax(not submit form), read the selected file in input file. You can help me…
Hi,
I need to send a similar form but using AJAX. Any solution?
Thanks a lot!
hai all
can you help me now?
For some of my homework (one of many problems)
“how to uploading file xls with asp mvc 3 to database? ”
share with me please, simple sample
programming ASP MVC3
Database SQL SERVER
example databases name_DB = db_school, name_table = tbl_student, Field = – id, name
Thanks for detailed explanation. Before visiting to this page I didn’t knew anything about file upload, Now i can write file upload code easily..
Regards
sid
I was not sure where the files were uploaded…
So,I just got your code a little modified with d help of some other example:
And here is the full running code:
1.Just Create D:\Test\Upload directory structure or whatever.
2.Copy this code to FileUploadController.java
when I copied your updated controller, the file is getting uploaded into the location. But, I’m getting this error. Please clarify.
java.io.IOException: Destination file [C:\Temp\Upload] already exists and could not be deleted
org.springframework.web.multipart.commons.CommonsMultipartFile.transferTo(CommonsMultipartFile.java:130)
I got the solution for the above exception. I just added a condition like this and added the files in the last step. Please see the code below:
Hi Sathya,
How to get a path and path will store mysqldatabase with the help of hibernate.please send me a code.Thanks@govardhan
thankyou soo muucch for ur valuable and timesaving concept :)
Thanks much Sathya :)
This was helpful :)
cool machi…yenga tale viral-kku oru ooooooo podu…
Hi viral could you please rectify this following exception
This really helped me. Struggled lot of time to get this done before seeing this tutorial/topic
Thankyou.
very nice tutorial for beginners.
Really a great tutorial. I am getting file name as null in controller. here is my controller code.
Please help me
Check if you have added
in spring-servlet.xml
Hi,
Thanks for sharing. Nice one .
Hi, dynamically added file type not working. when I click on add file and upload three files then also I get only default two file. Dynamically added file object are not available in controller.
Please help..!!.
I am getting the java.io.IOException: Destination file [C:\TEMP] already exists and could not be deleted.
However the file is getting uploaded and updated.
Please see my code below :
i want to show the image after upload image so can u help me to get that code in .jsp and also controller?
Hi viral, Really this examples helps me a lot, But plz do one help for me, plz develop a applicaiton to select two files from browser ( txt1, txt2) and display it on to the browser and while clicking on save button it will ask the location on harddisk to save the files.
And plz send me these application on to the my id – [email protected]
and if possible then give me ur number also into my id.
Thanking you
==========
Devesh Anand
How many changes are require to convert this to Ajax based file upload?
I have repository class where I want to store the image that is coming from MultipartFile to webapp/resources/images directory before adding the product details to the repository ?
my repository class is ResourceLoaderAware. I am getting fileNotFoundException, “imagesDesert.jpg” is the image I am trying to upload
Hi Viral,
Do you have any idea for sending Email with multiple attachments???? actually i refereed bellow link http://www.codejava.net/frameworks/spring/spring-mvc-send-e-mail-with-attachments its working fine for single attachment….
please if u have any idea share us…
Thank you
hey i want to remove attach files…
plz give me code as early as possible.
function confirmation()
{
alert(“Please check your mail and attachment”);
}
$(document).ready(function() {
//add more file components if Add is clicked
$(‘#addFile’).click(function() {
var fileIndex = $(‘#fileTable tr’).children().length;
if(fileIndex==0){
fileIndex=fileIndex;
}
else if(fileIndex==2){
fileIndex=fileIndex-1;
}
else{
var i=fileIndex/2-1;
fileIndex=i+1;
}
$(‘#fileTable’).append(
‘
‘);
});
$(‘#delfile’).live(‘click’, function() {
$(this).parent().parent().html(“”);
return false;
});
});
java code————————
thank you…..
Getting this error when i try to execute this code
java.lang.IllegalArgumentException: Document base C:\Documents and Settings\temp\My Documents\NetBeansProjects\WebRatan\build\web does not exist or is not a readable directory
viralupload
FileUploadController
FileUploadController
com.FileUploadController
FileUploadController
/FileUploadController
spring
org.springframework.web.servlet.DispatcherServlet
1
contextConfigLocation
/WEB-INF/spring-servlet.xml
org.springframework.web.context.ContextLoaderListener
spring
*.html
index.html
index.htm
index.jsp
default.html
default.htm
default.jsp
Hi viral, I have learnt so many things from ur blog….
Can you help me out for doing file uploading using angularjs and spring??
hey, viralpatel! I was wondering how one can store and retrieve an image (or a list of images) to and from a database, say, mysql. I’m really struggling with this for days now.
Thank you!
I followed Your code i want to save the file in data base can you specify the code in controller method like
dao.save();
And what to write in the Dao class
hi i got this error..please give me solution
type Exception report
message An exception occurred processing JSP page /index.jsp at line 1
description The server encountered an internal error that prevented it from fulfilling this request.
exception
org.apache.jasper.JasperException: An exception occurred processing JSP page /index.jsp at line 1
1:
How can i see the uploaded files can you please help me ..
Hi am getting null value in @ModelAttribute(“uploadForm”) FileUploadForm uploadForm
HI Viral,
After clicking on Upload button, I am getting this:
HTTP Status 404 – /SpringMVCMultipleFileUpload/save.html
type Status report
message /SpringMVCMultipleFileUpload/save.html
description The requested resource is not available.
Please suggest what I have missed.
tnx really helped
HI ViralPatel,
I need some help on a project i am creating and i am a noob to programming, although i have successfully managed to upload the files to the directory, i was wondering how i could save the different files to different folders respectively……eg. a pdf file format to pdf folder, word document to dord folder and image file to an image folders and so on… could u please help me
Hi , I want to save uploaded file in MySQL database , how I can do that please.
Hii, plz any one help me i strugulled to upload the image in jqgrid by using spring,
controller code:-
// This Method Is Used To Get Or Retrieve The Uploaded File And Save It In The database
@RequestMapping(value = “/insertSparePart”,method= {RequestMethod.POST,RequestMethod.GET})
public String saveSparePartUploadInDatabase(
HttpServletRequest request,
final @RequestParam CommonsMultipartFile[] data) throws Exception,SQLException, IllegalStateException, IOException {
spare_part_name = request.getParameter(“spare_part_name”);
System.out.println(“\n spare_part_name Is?= ” + spare_part_name + “\n”);
// Determine If There Is An File Upload.
if ((data != null) && (data.length > 0) && (!data.equals(data))) {
for (CommonsMultipartFile upload : data) {
if(upload.isEmpty()) {
} else {
if (!upload.getOriginalFilename().equals(“”)) {
SpareParts sparepa = new SpareParts();
/* sparepa.setUploaded_date(ApplicationUtil.dateFormatLong());*/
sparepa.setFile(upload.getOriginalFilename());
sparepa.setSpare_part_name(spare_part_name);
sparepa.setData(upload.getBytes());
// Calling The database Method To Save The Uploaded File In The Db
sparepartservice.insertSparePart(sparepa);
System.out.println(“ok ” );
}else {
System.out.println(“error”);
}
}
System.out.println(“File Is Successfully Uploaded…. \n”);
}
} else {
}
return “spare-parts-management”;
}
jsp page:-
spare parts
Search
img{
width:30%;
height:30px;}
$(document).ready(function () {
$(“#list”).jqGrid({
url:””,
datatype: ‘json’,
mtype: ‘GET’,
colNames:[‘SPAREPARTID’,’FILE’,’SPAREPARTNAME’,’DATA’,’UPLOADEDDATE’,’view’],
colModel:[
{name:’spare_part_id’,index:’spare_part_id’, width:100,key:true, /* editrules:{required:true}, */ editable:true,align:”center”, loadonce: true, editoptions:{size:10}},
{name:’file’,index:’file’, width:100,editable:true,loadonce: true, align:”center”, editrules:{required:true}, editoptions:{size:10}},
{name:’spare_part_name’,index:’spare_part_name’,align:”center”, width:100,editable:true,loadonce: true, editrules:{required:true}, editoptions:{size:10}},
{name:’data’,index:’data’, width:100,height:200, editrules:{required:true},editable:true,edittype:’file’,editoptions:{ enctype: “multipart/form-data” }, loadonce: true, editoptions:{size:10},formatter:formatImage},
{name:’uploaded_date’,index:’uploaded_date’, width:100, /* editable: true, */ loadonce: true, /* editrules:{required:true}, */ editoptions:{size:10}},
{name:’spare_part_id’, index: ‘spare_part_id’, width: 100, formatter: linkFormatter }
],
pager:jQuery(‘#pager’),
postData: {
filters:”filters”
},
//guiStyle: “bootstrap”,
iconSet: “fontAwesome”,
rowNum:true,
rowList:[1,2,4,6],
width: 800,
viewrecords: true,
loadonce:true,
rownumbers: true,
sortname : ‘spare_part_id’,
sortorder: “asc”,
filters:{“groupOp”:”AND”,”rules”:[]},
caption:”LISTOFSPAREPARTS”,
emptyrecords: “NO RECORDS TO DISPLAY”,
multiselect:false,
jsonReader : {
root: “rows”,
page: “page”,
total: “total”,
records: “records”,
repeatitems: false,
cell: “cell”,
id: “spare_part_id”
}
});
$(“#list”).jqGrid(‘navGrid’,’#pager’,
{stringResult: true, edit:false, add:false, del:false, search:true},
{edit:true, add:true, del:true, search:true, refresh:true},
{}, {}, {},
{ // search
sopt:[‘cn’ , ‘eq’, ‘ne’, ‘lt’, ‘gt’, ‘bw’, ‘ew’ ],
closeOnEscape: true,
multipleSearch: true,
closeAfterSearch: true
},{}
);
// Toolbar Search
jQuery(“#list”).jqGrid(‘filterToolbar’,{searchOperators : true});
$(“#list”).navButtonAdd(‘#pager’,
{ caption:”Add”,
buttonicon:”fa fa-lg fa-fw fa-plus”,
onClickButton: addRow,
position: “last”,
title:”ADD PACKAGE”,
cursor: “pointer”
}
);
$(“#list”).navButtonAdd(‘#pager’,
{ caption:”Edit”,
buttonicon:”fa fa-lg fa-fw fa-pencil”,
onClickButton: editRow,
position: “last”,
title:”EDIT PACKAGE”,
cursor: “pointer”
}
);
$(“#list”).navButtonAdd(‘#pager’,
{
caption:”Delete”,
buttonicon:”fa fa-lg fa-fw fa-trash-o”,
onClickButton: deleteRow,
position: “last”,
title:”DELETE PACKAGE”,
cursor: “pointer”
}
);
// Toolbar Search
//jQuery(“#list”).jqGrid(‘filterToolbar’,{searchOperators : true});
});
//status formatter
function linkFormatter(cellValue, options, rowdata, action) {
return “view“;
}
/* function editFormatter(cellValue, options, rowdata, action) {
return “Edit“;
} */
function addRow() {
// Get the currently selected row
$(‘#list’).jqGrid(‘editGridRow’,’new’,
{ url:””,
editData: {},
serializeEditData: function(data){
data.id = 0;
return $.param(data);
},
recreateForm: true,
beforeInitData: function(form) {},
contentType: false,
closeAfterAdd: true,
reloadAfterSubmit:true,
afterSubmit : function(response, postdata)
{
var result = eval(‘(‘ + response.responseText + ‘)’);
var errors = “”;
$(“#list”).jqGrid(‘setGridParam’,{datatype:’json’}).trigger(‘reloadGrid’);
if (result.success == false) {
for (var i = 0; i < result.message.length; i++) {
errors += result.message[i] + "”;
}
} else {
$(‘#msgbox’).text(‘Entry has been added successfully’);
$(‘#msgbox’).dialog(
{ title: ‘Success’,
modal: true,
buttons: {“Ok”: function() {
$(this).dialog(“close”);}
}
});
$(“#list”).jqGrid(‘setGridParam’,{datatype:’json’}).trigger(‘reloadGrid’);
}
// only used for adding new records
var newId = null;
return [result.success, errors, newId];
}
});
}
/* function addRow(response, postdata)
{
var data = $.parseJSON(response.responseText);
if (data.success == true) {
if ($(‘#list’).val() != “”)
{
ajaxlist(data.id);
}
}
return [data.success, data.message, data.id];
}
function ajaxlist(id)
{
$(“#loading”)
.ajaxStart(function () {
$(this).show();
})
.ajaxComplete(function () {
$(this).hide();
});
$.ajaxFileUpload
(
{
url:””,
secureuri: false,
fileElementId: ‘fileToUpload’,
dataType: ‘json’,
data: { id: id },
success: function (data, status) {
if (typeof (data.success) != ‘undefined’) {
if (data.success == true) {
return;
} else {
alert(data.message);
}
}
else {
return alert(‘Failed to upload logo!’);
}
},
error: function (data, status, e) {
return alert(‘Failed to upload logo!’);
}
}
)}
*/
// end of addRow
//image formatter
function formatImage(cellValue, options, rowObject) {
var imageHtml = “”;
return imageHtml;
}
function editRow() {
// Get the currently selected row
var row = $(‘#list’).jqGrid(‘getGridParam’,’selrow’);
if( row != null ) {
$(‘#list’).jqGrid(‘editGridRow’, row,
{ url: “”,
editData: {},
recreateForm: true,
beforeShowForm: function(form) {
$(‘#pData’).hide();
$(‘#nData’).hide();
},
beforeInitData: function(form) {},
closeAfterEdit: true,
reloadAfterSubmit:true,
afterSubmit : function(response, postdata)
{
var result = eval(‘(‘ + response.responseText + ‘)’);
var errors = “”;
$(“#list”).jqGrid(‘setGridParam’,{datatype:’json’}).trigger(‘reloadGrid’);
if (result.success == false) {
for (var i = 0; i < result.message.length; i++) {
errors += result.message[i] + "”;
}
} else {
$(‘#msgbox’).text(‘Entry has been edited successfully’);
$(‘#msgbox’).dialog(
{ title: ‘Success’,
modal: true,
buttons: {“Ok”: function() {
$(this).dialog(“close”);}
}
});
}
// only used for adding new records
var newId = null;
return [result.success, errors, newId];
}
});
} else {
$(‘#msgbox’).text(‘You must select a record first!’);
$(‘#msgbox’).dialog(
{ title: ‘Error’,
modal: true,
buttons: {“Ok”: function() {
$(this).dialog(“close”);}
}
});
}
}
function deleteRow(obj, args) {
// Get the currently selected row
var row = $(‘#list’).jqGrid(‘getGridParam’,’selrow’);
// A pop-up dialog will appear to confirm the selected action
if( row != null )
$(‘#list’).jqGrid( ‘delGridRow’, row,
{ url: “”,
recreateForm: true,
beforeShowForm: function(form) {
//Change title
$(“.delmsg”).replaceWith(” +
‘Delete selected record?’ + ”);
//hide arrows
$(‘#pData’).hide();
$(‘#nData’).hide();
},
reloadAfterSubmit:true,
closeAfterDelete: true,
serializeDelData: function (postdata) {
var rowdata = $(‘#list’).getRowData(postdata.id);
// append postdata with any information
return {id: postdata.id, oper: postdata.oper, packages: rowdata.packages};
},
afterSubmit : function(response, postdata)
{
var result = eval(‘(‘ + response.responseText + ‘)’);
var errors = “”;
$(“#list”).jqGrid(‘setGridParam’,{datatype:’json’}).trigger(‘reloadGrid’);
if (result.success == false) {
for (var i = 0; i < result.message.length; i++) {
errors += result.message[i] + "”;
}
} else {
$(‘#msgbox’).text(‘Entry has been deleted successfully’);
$(‘#msgbox’).dialog(
{ title: ‘Success’,
modal: true,
buttons: {“Ok”: function() {
$(this).dialog(“close”);}
}
});
}
// only used for adding new records
var newId = null;
return [result.success, errors, newId];
}
});
else {
$(‘#msgbox’).text(‘You must select a record first!’);
$(‘#msgbox’).dialog(
{ title: ‘Error’,
modal: true,
buttons: {“Ok”: function() {
$(this).dialog(“close”);}
}
});
}
}
$(“#mySearch”).click(function () {
var searchFiler = $(“#searchText”).val();
var grid = $(“#list”), f;
if (searchFiler.length === 0) {
grid[0].p.search = false;
$.extend(grid[0].p.postData, { filters: “” });
}
f = { groupOp: “OR”, rules: [] };
f.rules.push({ field: “spare_part_id”, op: “eq”, data: searchFiler });
f.rules.push({ field: “file”, op: “cn”, data: searchFiler });
f.rules.push({ field: “spare_part_name”, op: “cn”, data: searchFiler });
f.rules.push({ field: “data”, op: “cn”, data: searchFiler });
f.rules.push({ field: “uploaded_date”, op: “cn”, data: searchFiler });
grid[0].p.search = true;
$.extend(grid[0].p.postData, { filters: JSON.stringify(f) });
grid.trigger(“reloadGrid”, [{ page: 1, current: true }]);
});
please help me anyone
Hey, I am facing problem in storing the uploaded file in SQL database please help me