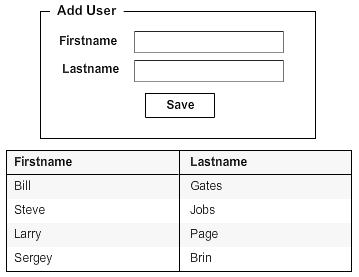
Welcome to Freemarker Tutorial Series. In previous post we created Spring MVC based Hello World Freemarker Template example. We learned few APIs of freemarker and also how to integrate it with Spring MVC based application. Following are the list of tutorials from Freemarker tutorial series. Today we will create a Struts2 based application that uses Freemarker FTL as view instead of JSP. This would give you a good insight in Struts2 + Freemarker integration. The application is similar to previous tutorial’s User app, where a list of users will be displayed and we can add new user. The application is very simple:
- There is a table that displays user info like firstname, lastname.
- New user can be added via Add User form.
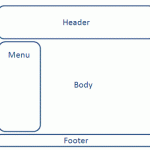
Below is the wireframe of our final Freemarker based Struts2 app.
So lets get started.
Things We Need
Before we starts with our Struts2 + FreeMarker example, we will need few tools.
- JDK 1.6 or above (download)
- Tomcat 6.x or above or any other container (Glassfish, JBoss, Websphere, Weblogic etc) (download)
- Eclipse 3.4.x or above (download)
- Struts 2.3.4.1 or above (download)
- Freemarker JAR v2.3.15 or above(download)
Let us start with our Struts2 based Freemarker application.
Step 1: Getting Started
Open Eclipse and goto File -> New -> Project and select Dynamic Web Project in the New Project wizard screen.
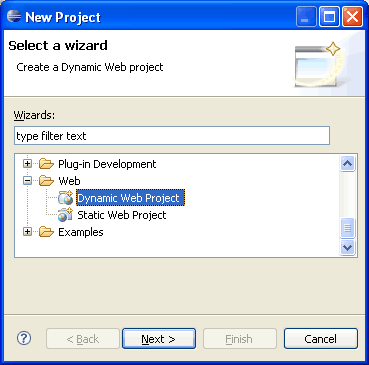
After selecting Dynamic Web Project, press Next.
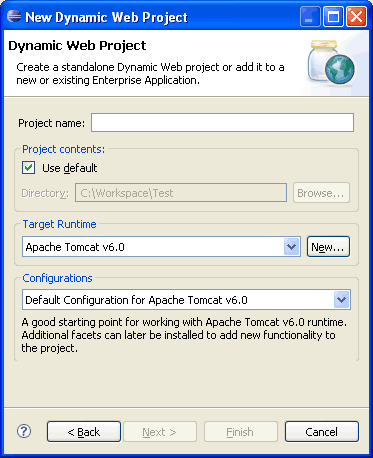
Write the name of the project. For example Freemarker_Struts2_example. Once this is done, select the target runtime environment (e.g. Apache Tomcat v6.0). This is to run the project inside Eclipse environment. After this press Finish. Once the project is created, you can see its structure in Project Explorer. This is how the project structure would look like when we finish the tutorial and add all source code.
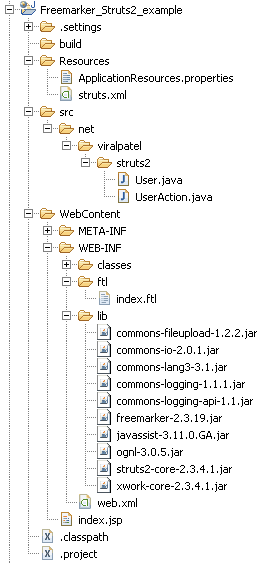
Till this step, our basic Eclipse web project is ready. We will now add Struts2 and Freemarker support to this project.
Step 2: Adding Struts2 Support
First copy all required Struts2 JAR and supporting JAR files in WebContent > WEB-INF > lib folder. Create this folder if it does not exists. Don’t worry if you do not have these JARs. You can download the complete source code with JAR files at the end of this tutorial. Next we change web.xml (deployment descriptor) and add Struts2 support to it. If you do not know why we do this, I strongly recommends you to go through Struts2 Tutorial series. Related:Struts2 hello world example Update the web.xml with following code:
File: /WebContent/WEB-INF/web.xml
<?xml version="1.0" encoding="UTF-8"?>
<web-app xmlns:xsi="http://www.w3.org/2001/XMLSchema-instance" xmlns="http://java.sun.com/xml/ns/j2ee" xmlns:javaee="http://java.sun.com/xml/ns/javaee" xmlns:web="http://java.sun.com/xml/ns/javaee/web-app_2_5.xsd" xsi:schemaLocation="http://java.sun.com/xml/ns/j2ee http://java.sun.com/xml/ns/j2ee/web-app_2_4.xsd" id="WebApp_9" version="2.4">
  <display-name>Freemarker Struts2 example - viralpatel.net</display-name>
  <filter>
    <filter-name>struts2</filter-name>
    <filter-class>
          org.apache.struts2.dispatcher.ng.filter.StrutsPrepareAndExecuteFilter
    </filter-class>
  </filter>
  <filter-mapping>
    <filter-name>struts2</filter-name>
    <url-pattern>/*</url-pattern>
  </filter-mapping>
  <welcome-file-list>
    <welcome-file>index.jsp</welcome-file>
  </welcome-file-list>
</web-app>
Code language: HTML, XML (xml)
The above code in web.xml will define a filter StrutsPrepareAndExecuteFilter and maps it with url pattern /*. Thus each request will go through the Struts2 framework and it will decide wheather an action is available which can be called or default action should be allowed. Also struts framework will try to load its configuration from struts.xml file. It expects this file to be present in classpath (WEB-INF/classes) of the application when the source is compiled. Thus we will create a source folder called Resources and put the struts.xml file in it.
To create a source folder, right click on your project in Project Explorer view of Eclipse and select New > Source Folder.
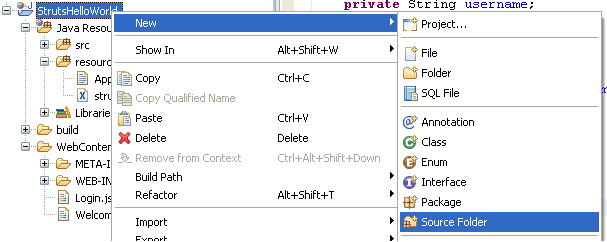
Specify folder name Resources and press Finish.

Create a new file struts.xml under Resources folder. Copy following code into it.
File: /Resources/struts.xml
<?xml version="1.0" encoding="UTF-8" ?>
<!DOCTYPE struts PUBLIC
    "-//Apache Software Foundation//DTD Struts Configuration 2.0//EN"
    "http://struts.apache.org/dtds/struts-2.0.dtd">

 <struts>
    <constant name="struts.enable.DynamicMethodInvocation"
        value="false" />
    <constant name="struts.devMode" value="false" />

    <package name="default" extends="struts-default" namespace="/">
        <action name="list" method="list"
            class="net.viralpatel.struts2.UserAction">
            <result type="freemarker" name="success">/WEB-INF/ftl/index.ftl</result>
        </action>
        <action name="add" method="add"
            class="net.viralpatel.struts2.UserAction">
            <result type="freemarker" name="success">/WEB-INF/ftl/index.ftl</result>
        </action>
    </package>
</struts>Code language: HTML, XML (xml)
Note that in above configuration file, we have defined User action of our application. We defined two actions using <action> tag. One to list the users and another to add new user. Note how we used attribute method="add" and method="list" to let Struts2 know which particular method needs to be called within the Action class. Also the result type mapped here is type="freemarker". Struts2 provides a first-class support to Freemarker template. All one has to do is to define result type freemarker. Struts automatically manage the view forwards in this case. On success of the action we forward the request to /WEB-INF/ftl/index.ftl freemarker view.
Step 3: Create Struts2 Action
Create new Struts2 action class UserAction under /src/net/viralpatel/struts2/ folder and copy following source code into it. File: /src/net/viralpatel/struts2/UserAction.java
package net.viralpatel.struts2;

import java.util.ArrayList;
import java.util.List;

import com.opensymphony.xwork2.ActionSupport;

public class UserAction extends ActionSupport {

	private static final long serialVersionUID = -8366209797454396351L;

	private static List<User> userList = new ArrayList<User>();

	private User user;

	static {
		userList.add(new User("Bill", "Gates"));
		userList.add(new User("Steve", "Jobs"));
		userList.add(new User("Larry", "Page"));
		userList.add(new User("Sergey", "Brin"));
		userList.add(new User("Larry", "Ellison"));
	}

    /**
     * Action method to display user list. Uses <code>userList</code> array
     * object defined as class level attribute to display list of users.
     * @return SUCCESS
     */
    public String list() {
    	return SUCCESS;
    }

    /**
     * Action method to add new user. Read the user information
     * via <code>user</code> object defined as class level attribute.
     * @return SUCCESS if user is added successfully
     */
    public String add() {

    	System.out.println("User:"+user);

        userList.add(user);

    	return SUCCESS;
    }

    public List<User> getUserList() {
	return userList;
    }

    public void setUserList(List<User> userList) {
	UserAction.userList = userList;
    }

    public User getUser() {
	return user;
    }

    public void setUser(User user) {
	this.user = user;
    }
}
Code language: Java (java)
In above Struts2 action class, we defined two methods: add() and list() for our application. Also note that we have created a static ArrayList userList, which holds the user information. This is a dummy list just to mimic database values. In an ideal application, you may have to call Database and fetch list of users from a table. But for sake of simplicity we stores users in an arraylist. Other than userList, we also defined User user object as class attribute. This object will store the user information when a new user is added. It act as a form bean object for action class. Apart from the above UserController class, we will also need a bean class User which holds the user information like firstname, lastname etc.
File: /src/net/viralpatel/struts2/User.java
package net.viralpatel;

public class User {
	private String firstname;
	private String lastname;

	public User() {
	}

	public User(String firstname, String lastname) {
		this.firstname = firstname;
		this.lastname = lastname;

	}

	//Add Getter and Setter methods
}Code language: Java (java)
Now add Freemarker view in your project.
Step 4: Create Freemarker Template File
Create a new file index.ftl under folder /WebContent/WEB-INF/ftl/. Copy following content into it.
File: /WebContent/WEB-INF/ftl/index.ftl
<html>
<head>
  <meta name="generator" content=
  "HTML Tidy for Linux/x86 (vers 11 February 2007), see www.w3.org" />

  <title>ViralPatel.net - FreeMarker Spring MVC Hello World</title>
</head>

<body>
  <div id="header">
    <h2><a href="//www.viralpatel.net"><img height="37" width="236" border="0px" src=
    "https://www.viralpatel.net/wp-content/themes/vp/images/logo.png" align=
    "left" /></a> FreeMarker Struts2 Hello World</h2>
  </div>

  <div id="content">
    <fieldset>
      <legend>Add User</legend>

	<@s.form action="add" method="post">
	    <@s.textfield label="First name" name="user.firstname"/>
	    <@s.textfield label="Last name" name="user.lastname"/>
	    <@s.submit value="Save"/>
	</@s.form>

    </fieldset><br />

    <table class="datatable">
      <tr>
        <th>Firstname</th>
        <th>Lastname</th>
      </tr>
	<#list userList as user>
  	<tr>
  		<td>${user.firstname}</td> <td>${user.lastname}</td>
  	</tr>
    </#list>
    </table>
  </div>
</body>
</html>Code language: HTML, XML (xml)
This is a simple FTL template file. We just iterate model userList list in a loop and prints user’s firstname and lastname in table. One last thing, the default index.jsp is opened when you tries to execute your application in eclipse. So just update it and add link to our User page. Modify the /WebContent/index.jsp file and add following code into it.
File: /WebContent/index.jsp
<html>
<head>
    <title>Welcome</title>
</head>
<body>
    <a href="list">Freemarker Struts2 example</a>
</body>
</html>Code language: HTML, XML (xml)
That’s All Folks
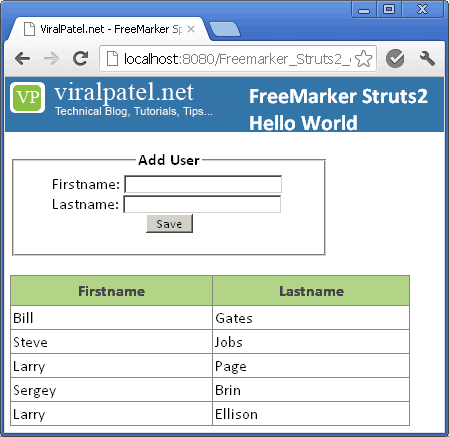
You may want to run the application see the result. I assume you have already configured Tomcat in eclipse. All you need to do: Open Server view from Windows > Show View > Server. Right click in this view and select New > Server and add your server details. To run the project, right click on Project name from Project Explorer and select Run as > Run on Server (Shortcut: Alt+Shift+X, R)
URL: http://localhost:8080/Freemarker_Struts2_example/list
Download Source Code
Freemarker_Struts2_example.zip (3.3 MB)

Hi,
How to integrate email template in java(servlets)
Hi
How to integrate email template in java
Getting below error, please advice:
Jan 16, 2013 11:27:02 AM org.apache.tomcat.util.digester.Digester endElement
SEVERE: End event threw exception
java.lang.reflect.InvocationTargetException
at sun.reflect.NativeMethodAccessorImpl.invoke0(Native Method)
at sun.reflect.NativeMethodAccessorImpl.invoke(NativeMethodAccessorImpl.java:79)
at sun.reflect.DelegatingMethodAccessorImpl.invoke(DelegatingMethodAccessorImpl.java:43)
at java.lang.reflect.Method.invoke(Method.java:618)
Good Tutorial
OK,
How can you combine freemarker with tiles???
type=”freemarker” or type=”tile”
How to make an integration???
Thx
Hi dear freind teatcher . . . I have this problem :
Expression user is undefined on line 35, column 15 in WEB-INF/ftl/index.ftl.
what is the cause please?
thanks.
Hi folk good work but i facing following error:
HTTP Status 404 – There is no Action mapped for namespace [/] and action name [list] associated with context path [/Freemarker_Struts2_example].
when i m trying to make this program in my laptopit run good but not in my desktop . i have facing same problem. Please help me…
Hi Viral,
Really a great tutorial but having one error.When you declare any member as static in action class then to use that variable in view layer you have to set one constant in struts.xml
this one:
How to integrate freemarker to struts1.x
can you plese help me
Can anybody tell me Free Maker Template using with Servlet or can we fetch data from database
using Servlet or Free maker Template
constant name=”struts.ognl.allowStaticMethodAccess” value=”true”/
very nice and thanks you very much