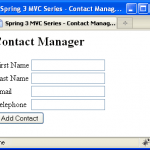
Welcome to Freemarker Tutorial Series. In previous post we created Servlet based Hello World Freemarker Template example. We learned few APIs of freemarker and also how to integrate it with Servlet based application. Following are the list of tutorials from Freemarker tutorial series. Today we will create a Spring MVC based application that uses Freemarker FTL as view instead of JSP. This would give you a good insight in Spring MVC + Freemarker integration. The application is similar to previous tutorial’s User app, where a list of users will be displayed and also we can add new user. The application is very simple:
- There is a table that displays user info like firstname, lastname.
- New user can be added via Add User form.
Below is the wireframe of our final freemarker based spring mvc 3 app.

So lets get started.
Things We Need
Before we starts with our Spring MVC 3 + FreeMarker example, we will need few tools.
- JDK 1.6 or above (download)
- Tomcat 6.x or above or any other container (Glassfish, JBoss, Websphere, Weblogic etc) (download)
- Eclipse 3.4.x or above (download)
- Spring MVC 3.1.2 or above (download)
- Freemarker JAR v2.3.15 or above(download)
Let us start with our Spring MVC based Freemarker application.
Step 1: Getting Started
Open Eclipse and goto File -> New -> Project and select Dynamic Web Project in the New Project wizard screen.

After selecting Dynamic Web Project, press Next.

Write the name of the project. For example Freemarker_SpringMVC_example. Once this is done, select the target runtime environment (e.g. Apache Tomcat v6.0). This is to run the project inside Eclipse environment. After this press Finish. Once the project is created, you can see its structure in Project Explorer. This is how the project structure would look like when we finish the tutorial and add all source code.

Till this step, our basic Eclipse web project is ready. We will now add Spring MVC and Freemarker support to this project.
Step 2: Adding Spring MVC Support
First copy all required Spring MVC and supporting JAR files in WebContent > WEB-INF > lib folder. Create this folder if it does not exists. Don’t worry if you do not have these JARs. You can download the complete source code with JAR files at the end of this tutorial. Next we change web.xml (deployment descriptor) and add Spring MVC support to it. If you do not know why we do this, I strongly recommends you to go through Spring 3 MVC Tutorial series.
Related:Spring 3 MVC hello world example
Update the web.xml with following code:
File: /WebContent/WEB-INF/web.xml
<?xml version="1.0" encoding="UTF-8"?>
<web-app xmlns:xsi="http://www.w3.org/2001/XMLSchema-instance"
    	xmlns="http://java.sun.com/xml/ns/javaee"
    	xmlns:web="http://java.sun.com/xml/ns/javaee/web-app_2_5.xsd"
    	xsi:schemaLocation="http://java.sun.com/xml/ns/javaee http://java.sun.com/xml/ns/javaee/web-app_3_0.xsd"
    	id="WebApp_ID" version="3.0">

  <display-name>Freemarker_SpringMVC_example</display-name>
  <welcome-file-list>
    <welcome-file>index.html</welcome-file>
    <welcome-file>index.jsp</welcome-file>
  </welcome-file-list>

  <servlet>
        <servlet-name>spring</servlet-name>
        <servlet-class>
            org.springframework.web.servlet.DispatcherServlet
        </servlet-class>
        <load-on-startup>1</load-on-startup>
    </servlet>
    <servlet-mapping>
        <servlet-name>spring</servlet-name>
        <url-pattern>*.html</url-pattern>
    </servlet-mapping>
</web-app>Code language: HTML, XML (xml)
The above code in web.xml will map DispatcherServlet with url pattern *.html. One thing to note here is the name of servlet in <servlet-name> tag in web.xml. Once the DispatcherServlet is initialized, it will look for a file name [servlet-name]-servlet.xml in WEB-INF folder of web application. In this example, the framework will look for file called spring-servlet.xml. Create a new file spring-servlet.xml under /WebContent/WEB-INF/ folder. This is the spring configuration. Copy following code into it.
File: /WebContent/WEB-INF/spring-servlet.xml
<?xml version="1.0" encoding="UTF-8"?>
<beans xmlns="http://www.springframework.org/schema/beans"
    xmlns:xsi="http://www.w3.org/2001/XMLSchema-instance"
    xmlns:p="http://www.springframework.org/schema/p"
    xmlns:context="http://www.springframework.org/schema/context"
    xsi:schemaLocation="http://www.springframework.org/schema/beans http://www.springframework.org/schema/beans/spring-beans-3.0.xsd 				http://www.springframework.org/schema/context http://www.springframework.org/schema/context/spring-context-3.0.xsd">

    <!-- freemarker config -->
	<bean id="freemarkerConfig" class="org.springframework.web.servlet.view.freemarker.FreeMarkerConfigurer">
	  <property name="templateLoaderPath" value="/WEB-INF/ftl/"/>
	</bean>

	<!--
	  View resolvers can also be configured with ResourceBundles or XML files. If you need
	  different view resolving based on Locale, you have to use the resource bundle resolver.
	-->
	<bean id="viewResolver" class="org.springframework.web.servlet.view.freemarker.FreeMarkerViewResolver">
	  <property name="cache" value="true"/>
	  <property name="prefix" value=""/>
	  <property name="suffix" value=".ftl"/>
	</bean>

	<context:component-scan
        base-package="net.viralpatel" />

</beans>Code language: HTML, XML (xml)
In the above xml configuration file, we have defined a tag <context:component-scan>. This will allow Spring to load all the components from package net.viralpatel and all its child packages. This will load our UserController class. Also we have defined a bean viewResolver. We uses org.springframework.web.servlet.view.freemarker.FreeMarkerViewResolver as view resolver. Also notice how we defined bean freemarkerConfig. This defines Freemarker configuration, in our case just one property templateLoaderPath; the path where we will store all our .ftl template files. Thus the bean viewResolver will resolve the freemarker template view. Note that in our UserController class, we have return a view name “index”. This will be resolved to path /WEB-INF/ftl/index.ftl by FreeMarkerViewResolver.
Step 3: Create Spring MVC Controller
File: /src/net/viralpatel/UserController.java
package net.viralpatel;

import java.util.ArrayList;
import java.util.List;

import org.springframework.stereotype.Controller;
import org.springframework.ui.ModelMap;
import org.springframework.web.bind.annotation.ModelAttribute;
import org.springframework.web.bind.annotation.RequestMapping;
import org.springframework.web.bind.annotation.RequestMethod;

@Controller
public class UserController {
	/**
	 * Static list of users to simulate Database
	 */
	private static List<User> userList = new ArrayList<User>();

	//Initialize the list with some data for index screen
	static {
		userList.add(new User("Bill", "Gates"));
		userList.add(new User("Steve", "Jobs"));
		userList.add(new User("Larry", "Page"));
		userList.add(new User("Sergey", "Brin"));
		userList.add(new User("Larry", "Ellison"));
	}

	/**
	 * Saves the static list of users in model and renders it
	 * via freemarker template.
	 *
	 * @param model
	 * @return The index view (FTL)
	 */
	@RequestMapping(value = "/index", method = RequestMethod.GET)
	public String index(@ModelAttribute("model") ModelMap model) {

		model.addAttribute("userList", userList);

		return "index";
	}

	/**
	 * Add a new user into static user lists and display the
	 * same into FTL via redirect
	 *
	 * @param user
	 * @return Redirect to /index page to display user list
	 */
	@RequestMapping(value = "/add", method = RequestMethod.POST)
	public String add(@ModelAttribute("user") User user) {

		if (null != user && null != user.getFirstname()
				&& null != user.getLastname() && !user.getFirstname().isEmpty()
				&& !user.getLastname().isEmpty()) {

			synchronized (userList) {
				userList.add(user);
			}

		}

		return "redirect:index.html";
	}
}Code language: Java (java)
The UserController is a simple Spring 3 MVC controller that handles request/response. We have created a private static List userList which stores the user entries. Note that in ideal example you would like to read data from database. But for sake of simplicity we will stick to static List :) There are two methods index() and add(), both mapped via @RequestMapping annotation. The index() method will simply store the users list in model object and render “index” view (index.ftl). And the add() method gets the user details from html form and add it inside static List. Once the add() has added user, it simply redirects the request to /index.html which will render the user list. Apart from the above UserController class, we will also need a bean class User which holds the user information like firstname, lastname etc.
File: /src/net/viralpatel/User.java
package net.viralpatel;

public class User {
	private String firstname;
	private String lastname;

	public User() {
	}

	public User(String firstname, String lastname) {
		this.firstname = firstname;
		this.lastname = lastname;

	}

	//Add Getter and Setter methods
}Code language: Java (java)
Now add Freemarker view in your project.
Step 4: Create Freemarker Template Files
Create a new file index.ftl under folder /WebContent/WEB-INF/ftl/. Copy following content into it.
File: /WebContent/WEB-INF/ftl/index.ftl
<html>
<head><title>ViralPatel.net - FreeMarker Spring MVC Hello World</title>
<body>
<div id="header">
<H2>
	<a href="//www.viralpatel.net"><img height="37" width="236" border="0px" src="https://www.viralpatel.net/wp-content/themes/vp/images/logo.png" align="left"/></a>
	FreeMarker Spring MVC Hello World
</H2>
</div>

<div id="content">

  <fieldset>
  	<legend>Add User</legend>
  <form name="user" action="add.html" method="post">
  	Firstname: <input type="text" name="firstname" />	<br/>
  	Lastname: <input type="text" name="lastname" />	<br/>
  	<input type="submit" value="   Save   " />
  </form>
  </fieldset>
  <br/>
  <table class="datatable">
  	<tr>
  		<th>Firstname</th>  <th>Lastname</th>
  	</tr>
    <#list model["userList"] as user>
  	<tr>
  		<td>${user.firstname}</td> <td>${user.lastname}</td>
  	</tr>
    </#list>
  </table>

</div>
</body>
</html>
Code language: HTML, XML (xml)
This is a simple FTL template file. We just iterate model[“userList”] list in a loop and prints user’s firstname and lastname in table.
That’s All Folks
You may want to run the application see the result. I assume you have already configured Tomcat in eclipse. All you need to do: Open Server view from Windows > Show View > Server. Right click in this view and select New > Server and add your server details. To run the project, right click on Project name from Project Explorer and select Run as > Run on Server (Shortcut: Alt+Shift+X, R)
URL: http://localhost:8080/Freemarker_SpringMVC_example/index.html

Download Source Code
Freemarker_SpringMVC_example.zip (4.4 MB)

And what to put in index.jsp or index.html?
index.jsp is not required. Ignore the same in screenshot. I will update this. Just open the URL http://localhost:8080//index.html in browser. It will redirect to appropriate Spring controller.
I made my favorite mistake : didn’t read carefully ^^ thx for answer
nice post actually it may be useful for most of the people
Thanks Viral for your contribution. This is helpful.
Hi,
How to validate template interpolations.
Eg: Dear ${user.lastname}
if in the template preparation I missed $ symbol before expression and write it as {user.lastName}, In the preview it showing as Dear {user.lastName} which is wrong, then I have to validate it. How to handle such things.
Hey How to adjust in struts2 .. that validation error comes Upper of the control by defualt make to right of the controls via freemarker??
plzz give me tutorial,..
Hi Viral, I am trying to run the your project m but is is giving me error that the requested resorce is not available. I have not created index.jsp file. Please help me.
It is is giving the error that the requested resorce is not available. I have not created index.jsp file. can anyone help me? plz…
hey your project is not working..
Hi Viral,
Its a nice article. thanks for sharing it.
Could you help me to understand , how can I write form in freemarker for parsing nested java object. To be more specific , I want my form should written below object on submission
And I am using Spring MVC 3.2.
How to resolve this issue?
In your spring-servlet.xml file, you have this line:
To which the compiler is saying:
“No setter found for property ‘templateLoaderPath’ in class
‘org.springframework.web.servlet.view.freemarker.FreeMarkerConfigurer'”
How to work around this issue?
You need to include spring-context-support.jar. FreeMarkerConfigurationFactory was moved. See:
https://jira.springsource.org/browse/SPR-10233?page=com.atlassian.jira.plugin.system.issuetabpanels:all-tabpanel
How to resolve this issue?
In your spring-servlet.xml file, you have this line:
To which the compiler is saying:
“No setter found for property ‘templateLoaderPath’ in class
‘org.springframework.web.servlet.view.freemarker.FreeMarkerConfigurer’”
How to work around this issue?
Hi Viral,
You have explained it in detail, even a beginner can just follow your instructions and learn. Thanks for sharing it.
Hi Viral,
I ‘ m getting this error can you help me to solve this problem.
type Status report
message /FreeMarker/add
description The requested resource (/FreeMarker/add) is not available.
java.lang.ClassNotFoundException: org.apache.commons.logging.LogFactory
at org.apache.catalina.loader.WebappClassLoader.loadClass(WebappClassLoader.java:1680)
at org.apache.catalina.loader.WebappClassLoader.loadClass(WebappClassLoader.java:1526)
at org.springframework.web.servlet.DispatcherServlet.(DispatcherServlet.java:243)
at sun.reflect.NativeConstructorAccessorImpl.newInstance0(Native Method)
at sun.reflect.NativeConstructorAccessorImpl.newInstance(Unknown Source)
at sun.reflect.DelegatingConstructorAccessorImpl.newInstance(Unknown Source)
I got this error message “HTTP Status 503 – Servlet freemarker is currently unavailable” when run this project in intellij
Am I wrong in thinking that you did not need to create “@ModelAttribute(“model”)” since you could merely access the Spring “model” directly? This would mean that the FTL file could have simply referenced “userList” instead of “model[‘userList’]”.
Thanks for sharing.
Thanks man.
thanks Viral
Hey, I’ve converted this program logic into Maven Project and its working fine.
How to make controller return both JSP ad FTl. I am working on a proj that uses both. Though i have configured freemarker above JSP configuration
in servlet context.xml. the controller keeps referring to jsp.
Can yyou help?
Nice Post viral….,,
Could you tell me In real project who will be responsible to create freemarker template , UI DEVELOPER or BACK-END DEVELOPER…..??
How can i integrate with bootstrap?
Hey ….after adding another user in the list ,it is not reflecting in the final list.
Hi VP.. can you help me in implementing the below your example using freemarker please..
https://www.viralpatel.net/spring-mvc-multi-row-submit-java-list/?unapproved=263830&moderation-hash=ed502e7c56ad66e2387d6e7ccea51e1e#comment-263830