Spring Boot JSP example – Spring Boot has gained a lot of traction in past few years. Thanks to its opinionated approach on Java web application, its very easy to start a Web project and get up and running in no time. In this tutorial we will create a simple Spring Boot based application which will render view using JSP. Most of the code can be auto-generated using start.spring.io.
We will use following technologies for this project.
- Spring Boot v1.5.7
- Java 8
- Maven 3.3.9
1. Maven Dependencies for Spring Boot JSP
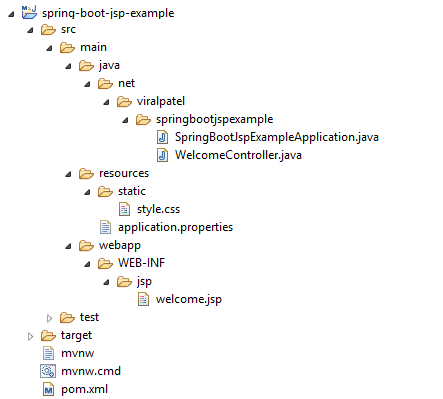
Let’s look at the directory structure first. This is usual maven based web project with src/ test/ and resources/ folder. Note that the main class for our Spring Boot JSP example project is SpringBootJspExampleApplication.
Following is the pom.xml that defines the dependencies for our hello world Spring Boot JSP project.
pom.xml
<?xml version="1.0" encoding="UTF-8"?>
<project xmlns="http://maven.apache.org/POM/4.0.0" xmlns:xsi="http://www.w3.org/2001/XMLSchema-instance" xsi:schemaLocation="http://maven.apache.org/POM/4.0.0 http://maven.apache.org/xsd/maven-4.0.0.xsd">
   <modelVersion>4.0.0</modelVersion>
   <groupId>net.viralpatel</groupId>
   <artifactId>spring-boot-jsp-example</artifactId>
   <version>0.0.1-SNAPSHOT</version>
   <packaging>jar</packaging>
   <name>spring-boot-jsp-example</name>
   <description>Spring Boot JSP Hello World example</description>
   <parent>
      <groupId>org.springframework.boot</groupId>
      <artifactId>spring-boot-starter-parent</artifactId>
      <version>1.5.7.RELEASE</version>
      <relativePath />
      <!-- lookup parent from repository -->
   </parent>
   <properties>
      <project.build.sourceEncoding>UTF-8</project.build.sourceEncoding>
      <project.reporting.outputEncoding>UTF-8</project.reporting.outputEncoding>
      <java.version>1.8</java.version>
   </properties>
   <dependencies>
      <!-- Compile -->
      <dependency>
         <groupId>org.springframework.boot</groupId>
         <artifactId>spring-boot-starter-web</artifactId>
      </dependency>
      <dependency>
         <groupId>javax.servlet</groupId>
         <artifactId>jstl</artifactId>
      </dependency>
      <!-- Provided -->
      <dependency>
         <groupId>org.springframework.boot</groupId>
         <artifactId>spring-boot-starter-tomcat</artifactId>
         <scope>provided</scope>
      </dependency>
      <dependency>
         <groupId>org.apache.tomcat.embed</groupId>
         <artifactId>tomcat-embed-jasper</artifactId>
         <scope>provided</scope>
      </dependency>
      <!-- Test -->
      <dependency>
         <groupId>org.springframework.boot</groupId>
         <artifactId>spring-boot-starter-test</artifactId>
         <scope>test</scope>
      </dependency>
   </dependencies>
   <build>
      <plugins>
         <plugin>
            <groupId>org.springframework.boot</groupId>
            <artifactId>spring-boot-maven-plugin</artifactId>
         </plugin>
      </plugins>
   </build>
</project>Code language: HTML, XML (xml)
Spring Boot takes care of all the dependencies version through starter pom. We have defined the parent pom as spring-boot-starter-parent. Parent pom defines all the versioning so that we do not have to worry about version compatibility of different libraries. We have defined compiled time dependency spring-boot-starter-web and jstl for our JSP example. This will include all required Spring Web MVC and other dependencies.
2. Spring Boot Application Class
Once the Maven pom is in place, let’s check the Main class SpringBootJspExampleApplication.
SpringBootJspExampleApplication.java
package net.viralpatel.springbootjspexample;

import org.springframework.boot.SpringApplication;
import org.springframework.boot.autoconfigure.SpringBootApplication;
import org.springframework.boot.builder.SpringApplicationBuilder;
import org.springframework.boot.web.support.SpringBootServletInitializer;

@SpringBootApplication
public class SpringBootJspExampleApplication  extends SpringBootServletInitializer {

	@Override
	protected SpringApplicationBuilder configure(SpringApplicationBuilder application) {
		return application.sources(SpringBootJspExampleApplication.class);
	}

	public static void main(String[] args) throws Exception {
		SpringApplication.run(SpringBootJspExampleApplication.class, args);
	}

}Code language: Java (java)
As we saw earlier, this class is the starting point in Spring Boot application. We have annotated it with @SpringBootApplication annotation. Spring Boot provides this convenient annotation which is simply wraps @Configuration, @EnableAutoConfiguration and @ComponentScan with their default attributes.
@Configuration annotation marks this class as a configuration class. At runtime, spring will instantiate bean of this class and register it with Application context. @Configuration also indicates that this class can have one or more @Bean methods which Spring will use to register custom bean definitions.
@EnableAutoConfiguration is the magic annotation that Spring Boot uses to do its magic trick. This annotation enables Spring’s auto-configuration mechanism to load Spring’s application context with some default beans and configuration.
@ComponentScan annotation defines the base package from where Spring will start scanning for beans with stereotype annotations (@Controller, @Service, @Component etc.) Since we have simply defined @SpringBootApplication annotation, Spring will only scan package where SpringBootJspExampleApplication is defined (net.viralpatel.springbootjspexample) and all children packages (net.viralpatel.springbootjspexample.*). If some of your beans are not initialised in your Spring Boot application, then its always good to first see where your SpringBootApplication class sits.
Our SpringBootJspExampleApplication class extends SpringBootServletInitializer class. This is Spring boot’s class is an opinionated implementation of WebApplicationInitializer which provides Java based (programmatic) configuration for ServletContext. This class makes it possible to define web app without web.xml.
3. Application properties for View resolver
Since this Spring Boot hello world app uses JSP to render view, lets define following properties in application.properties file.
application.properties
spring.mvc.view.prefix: /WEB-INF/jsp/
spring.mvc.view.suffix: .jsp

application.message: Hello World!!Code language: HTTP (http)
Spring uses ViewResolver to translate the view names in @Controller to actual View. The Spring auto-configuration (in this case WebMvcAutoConfiguration) will add few default ViewResolvers in your context. One of such view resolver is InternalResourceViewResolver. This defines prefix and suffix to the view name. We can override prefix and suffix by defining spring.mvc.view.prefix and spring.mvc.view.suffix in application.properties.
Now let’s check the Welcome Controller of our Spring Boot JSP example project.
WelcomeController.java
package net.viralpatel.springbootjspexample;

import java.util.Map;

import org.springframework.beans.factory.annotation.Value;
import org.springframework.stereotype.Controller;
import org.springframework.web.bind.annotation.GetMapping;

@Controller
public class WelcomeController {

	@Value("${application.message:Hello World}")
	private String helloMessage;

	@GetMapping("/")
	public String welcome(Map<String, Object> model) {

		model.put("message", helloMessage);

		return "welcome";
	}
}Code language: Java (java)
Nothing fancy in our WelcomeController. It defines welcome() method which maps “/” endpoint using @GetMapping (request mapping) annotation. The model is an hashmap that Spring will inject where we can put our data for view. Note that @Value annotation injects the property application.message in our controller. We can define default value for @Value attributes after : colon. Our welcome() method returns the view name “welcome” which Spring will map to JSP view (using InternalResourceViewResolver).
4. Static files – style.css
We can add any static content such as javascripts, css in /static directory. Create style.css under /static and copy following content.
style.css
body {
	font-size: 2em;
}Code language: CSS (css)
5. View – Welcome.jsp
And finally lets define the welcome.jsp under /WEB-INF/jsp/ directory.
welcome.jsp
<!DOCTYPE html>
<%@ taglib prefix="c" uri="http://java.sun.com/jsp/jstl/core"%>

<html lang="en">
<head>
	<title>Spring Boot JSP example</title>
	<link rel="stylesheet" type="text/css" href="/style.css">
</head>
<body>
	<br> Message: ${message}
</body>
</html>Code language: HTML, XML (xml)
We have referenced our stylesheet style.css in this JSP.
That’s all folks
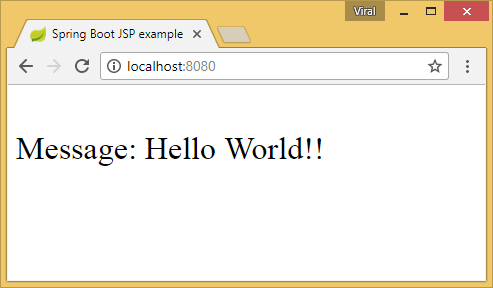
Run the Spring Boot JSP example project by running SpringBootJspExampleApplication class as Java class or using maven mvn spring-boot:run command.
Once the application starts, launch the browser and open:http://localhost:8080/
Download Source Code – Spring Boot JSP example
Source code of this Spring Boot JSP MVC Hello World tutorial is available in Github.
Github – spring-boot-jsp-example


Please, keep on posting articles. It is great the information that you give. Thanks
Thanks for the article, very clear
so clear and simple thank you
so clear very nice