Spring 4 MVC Tutorial with Eclipse, Maven – Spring 4 MVC is the newer version of our favourite Java MVC framework. A lot has improved in Spring since the Spring 3 MVC. In this tutorial we will create a simple web application from scratch in Eclipse that will use Spring’s latest version 4 MVC framework and Maven configuration. Also we will use Java configuration to configure Spring instead of older XML configuration.
Getting started with Spring 4 MVC Tutorial
1. Create a new Maven project
First things first, we will bootstrap a quick Maven project in Eclipse. Follow these simple steps and create a simple webapplication.
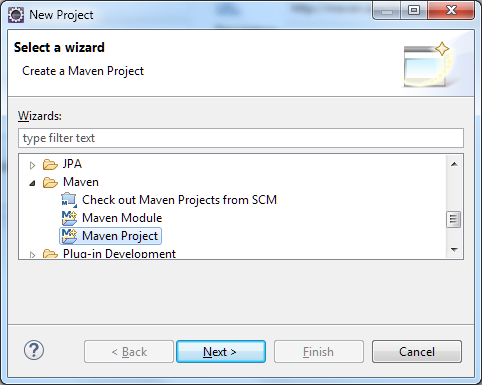
1.1 First in Eclipse go to File -> New and from New project dialog select Maven Project.
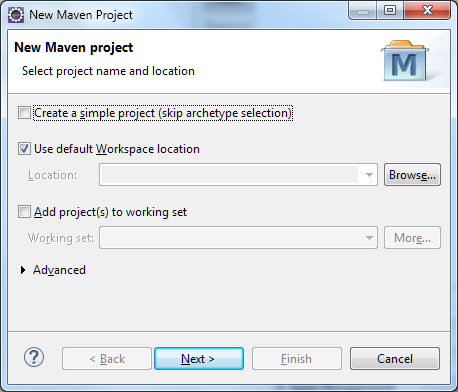
1.2 From New Maven Project dialog, leave the options as shown below and press Next.
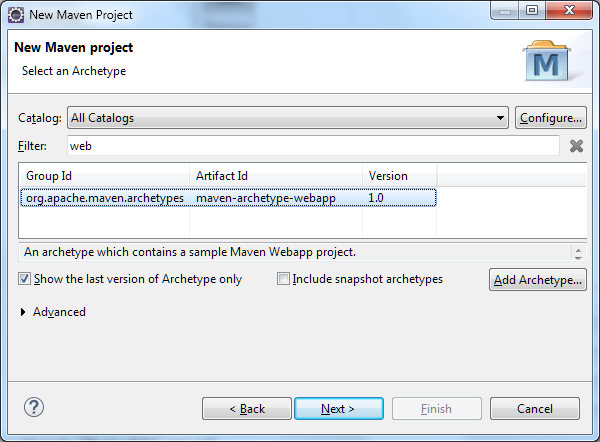
1.3 Now select the project Archetype from the options. Type “web” in the filter text and select maven-archetype-webapp.
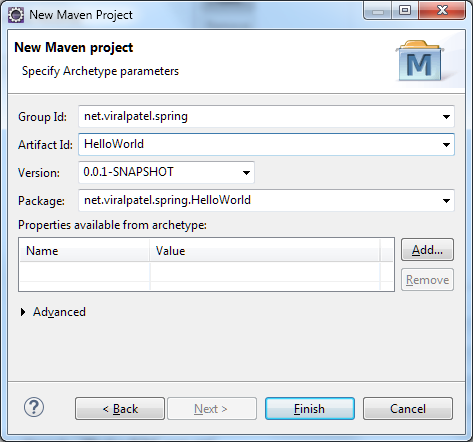
1.4 As shown below, provide the Group Id and Artifact Id. For this example I have given Group Id net.viralpatel.spring and Artifact Id as HelloWorld.

1.5 Once you press Finish, Eclipse should start generating Maven webapp using maven-archetype-webapp. Progress view should show the progress of this step.
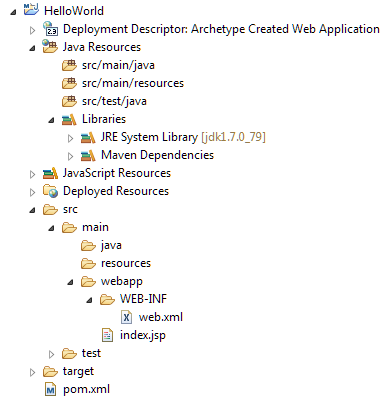
New project is created with pom.xml, WebContent folder and src folder.
2. Add Spring 4 MVC Maven dependencies
Project structure is created. Now let’s start and add first the maven dependencies for Spring 4 MVC in our pom.xml file.
Update pom.xml file and add following dependencies.
pom.xml
<?xml version="1.0" encoding="UTF-8"?>
<project xmlns="http://maven.apache.org/POM/4.0.0" xmlns:xsi="http://www.w3.org/2001/XMLSchema-instance" xsi:schemaLocation="http://maven.apache.org/POM/4.0.0 http://maven.apache.org/maven-v4_0_0.xsd">
   <modelVersion>4.0.0</modelVersion>
   <groupId>net.viralpatel.spring</groupId>
   <artifactId>HelloWorld</artifactId>
   <packaging>war</packaging>
   <version>0.0.1-SNAPSHOT</version>
   <name>HelloWorld Maven Webapp</name>
   <url>http://maven.apache.org</url>
   <properties>
      <java-version>1.7</java-version>
      <org.springframework-version>4.3.0.RELEASE</org.springframework-version>
   </properties>
   <dependencies>
      <dependency>
         <groupId>org.springframework</groupId>
         <artifactId>spring-webmvc</artifactId>
         <version>${org.springframework-version}</version>
      </dependency>
      <dependency>
         <groupId>javax.servlet</groupId>
         <artifactId>javax.servlet-api</artifactId>
         <version>3.0.1</version>
         <scope>provided</scope>
      </dependency>
      <dependency>
         <groupId>javax.servlet</groupId>
         <artifactId>jstl</artifactId>
         <version>1.2</version>
      </dependency>
   </dependencies>
   <build>
      <finalName>HelloWorld</finalName>
      <pluginManagement>
         <plugins>
            <plugin>
               <groupId>org.apache.tomcat.maven</groupId>
               <artifactId>tomcat7-maven-plugin</artifactId>
               <version>2.2</version>
               <configuration>
                  <path>/spring4</path>
               </configuration>
            </plugin>
            <plugin>
               <groupId>org.apache.maven.plugins</groupId>
               <artifactId>maven-compiler-plugin</artifactId>
               <version>2.3.2</version>
               <configuration>
                  <source>${java-version}</source>
                  <target>${java-version}</target>
               </configuration>
            </plugin>
            <plugin>
               <groupId>org.apache.maven.plugins</groupId>
               <artifactId>maven-war-plugin</artifactId>
               <version>2.4</version>
               <configuration>
                  <warSourceDirectory>src/main/webapp</warSourceDirectory>
                  <warName>helloworld</warName>
                  <failOnMissingWebXml>false</failOnMissingWebXml>
               </configuration>
            </plugin>
         </plugins>
      </pluginManagement>
   </build>
</project>Code language: HTML, XML (xml)
After updating pom.xml, Eclipse’s maven plugin should start resolving the dependencies.
3. Set Annotation based Configuration for Spring 4 MVC tutorial
For this Spring 4 MVC tutorial we are going to use Spring’s Java based configuration or annotation based configuration instead of old XML configuration. So now lets add the Java Configuration required to bootstrap Spring 4 MVC example in our webapp.
Create AppConfig.java file under /src folder. Give appropriate package name to your file.
/src/main/java/net/viralpatel/spring/config/AppConfig.java
package net.viralpatel.spring.config;

import org.springframework.context.annotation.Bean;
import org.springframework.context.annotation.ComponentScan;
import org.springframework.context.annotation.Configuration;
import org.springframework.web.servlet.ViewResolver;
import org.springframework.web.servlet.config.annotation.DefaultServletHandlerConfigurer;
import org.springframework.web.servlet.config.annotation.EnableWebMvc;
import org.springframework.web.servlet.config.annotation.WebMvcConfigurerAdapter;
import org.springframework.web.servlet.view.InternalResourceViewResolver;
import org.springframework.web.servlet.view.JstlView;

@Configuration
@EnableWebMvc
@ComponentScan(basePackages = "net.viralpatel.spring")
public class AppConfig extends WebMvcConfigurerAdapter {
	@Bean
	public ViewResolver viewResolver() {
		InternalResourceViewResolver viewResolver = new InternalResourceViewResolver();
		viewResolver.setViewClass(JstlView.class);
		viewResolver.setPrefix("/WEB-INF/views/");
		viewResolver.setSuffix(".jsp");

		return viewResolver;
	}

	@Override
	public void configureDefaultServletHandling(DefaultServletHandlerConfigurer configurer) {
		configurer.enable();
	}
}Code language: Java (java)
AppConfig class is annotated with Spring’s annotations such as @Configuration, @EnableWebMvc and @ComponentScan.
The @Configuration annotation indicates that the class declares one or more @Bean methods. These methods are invoked at runtime by Spring to manage lifecycle of the beans. In our case we have defined @Bean for view resolver for JSP view.
The @EnableWebMvc is equivalent to <mvc:annotation-driven /> in XML. It enables support for @Controller-annotated classes that use @RequestMapping or @GetMapping to map incoming requests to certain methods.
The @ComponentScan annotation is equivalent to <context:component-scan> in XML. It will scan through the given package and register all the Controllers and beans.
The configureDefaultServletHandling() method is overridden and we enable default servlet handler. This will let other http request such as .css, .js slip through the usual DispatcherServlet and let the container process them. So now we can serve the static files css and javascript from our WebApp folder.
4. Set Servlet 3.X Java Configuration
Create AppInitializer class under config package. This class will replace web.xml and it will map the spring’s dispatcher servlet and bootstrap it.
/src/main/java/net/viralpatel/spring/config/AppInitializer.java
package net.viralpatel.spring.config;

import javax.servlet.ServletContext;
import javax.servlet.ServletException;
import javax.servlet.ServletRegistration;

import org.springframework.web.WebApplicationInitializer;
import org.springframework.web.context.support.AnnotationConfigWebApplicationContext;
import org.springframework.web.servlet.DispatcherServlet;

public class AppInitializer implements WebApplicationInitializer {

	public void onStartup(ServletContext container) throws ServletException {

		AnnotationConfigWebApplicationContext ctx = new AnnotationConfigWebApplicationContext();
		ctx.register(AppConfig.class);
		ctx.setServletContext(container);

		ServletRegistration.Dynamic servlet = container.addServlet("dispatcher", new DispatcherServlet(ctx));

		servlet.setLoadOnStartup(1);
		servlet.addMapping("/");
	}
}Code language: Java (java)
We have configured the dispatcher servlet using standard Java based configuration instead of the older web.xml. Thus web.xml is no longer required and we can simply delete it.
5. Create the Controller
Create a sample controller HelloController.java under controller package. This will have a simple hello() method that act as starting point. Notice how we have used @GetMapping annotation provided as part of Spring 4 MVC. This is equivalent to @RequestMapping GET.
/src/main/java/net/viralpatel/spring/controller/HelloController.java
package net.viralpatel.spring.controller;

import org.springframework.stereotype.Controller;
import org.springframework.ui.Model;
import org.springframework.web.bind.annotation.GetMapping;

@Controller
public class HelloController {

	@GetMapping("/hello")
	public String hello(Model model) {

		model.addAttribute("name", "John Doe");

		return "welcome";
	}
}Code language: CSS (css)
6. Create the View and Stylesheet
6.1 Create welcome.jsp file under WEB-INF/views folder. This will be our primary view file.
/src/main/webapp/WEB-INF/views/welcome.jsp
<%@taglib uri="http://java.sun.com/jsp/jstl/core" prefix="c"%>
<!DOCTYPE html>
<html>
<head>
	<title>Spring 4 MVC Hello World Example with Maven Eclipse</title>
	<link rel='stylesheet' href='<c:url value="/resources/css/style.css" />' type='text/css' media='all' />
</head>
<body>
	<h2>Hello World, Spring MVC</h2>

	<p>Welcome, ${name}</p>
</body>
</html>Code language: HTML, XML (xml)
6.2 Next creat the stylesheet for Spring MVC sample.
/src/main/webapp/resources/css/style.css
body {
	background-color: wheat;
}Code language: CSS (css)
That’s All Folks
It’s time to execute the project. In Eclipse you can start Tomcat and run the project inside it. Or you can run the project using Embedded Tomcat using Maven.
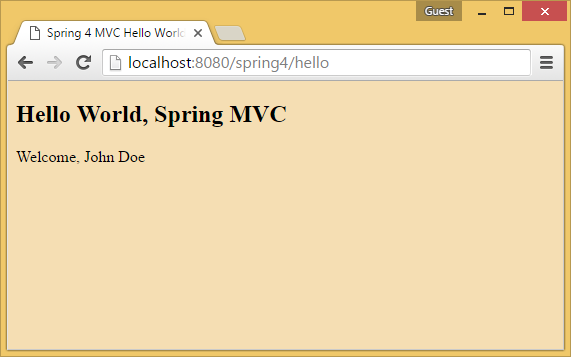
Once the application starts successfully, launch the browser and open http://localhost:8080/spring4/hello.
Download Source Code – Spring 4 MVC Tutorial
Source code of this Spring 4 MVC Hello World tutorial is available in Github.
- Download – spring4-mvc-example.zip (6.54 KB)
- Github – spring4-mvc-example.git

Hello,
Thank you for this usefull tutorial.
Juste a question please, why do you put “spring4” in the test URL ? http://localhost:8080/spring4/hello.
Best Regards
Nordine
The example is run under maven tomcat 7 plugin:
org.apache.tomcat.maven
tomcat7-maven-plugin
…
/spring4
…
You can check it out in pom.xml and the above link Embedded Tomcat using Maven.
If you build it at war and deploy to a standalone tomcat instance, you need to use the war name as context
Thanks
Eddie
Hello,
This tutorial is not working for me. Can you tell me why did you put “spring” in the test URL and not the actual context name?
Thanks,
Nilesh
I have copied your complete project for Spring MVC. But value of name mapped through Model object is not accessible in the JSP view. I tried with ELIgnored attribute , by enableing EL by using page directive in the JSP. But still value of name is not accessible through JSP . What is the reason ?
try with instead of ${name}
try with c:out value=”${name}”
You need to include spring taglibs in the jsp to get the mapping correct.
Hi Sucheta,
The reason the name is not accesible is because you are using an old JSP 1.2 descriptor. Look out for the solution is the below link. https://www.mkyong.com/spring-mvc/modelandviews-model-value-is-not-displayed-in-jsp-via-el/
Hello Sir, Thanks for sharing, Good Work.
Could you please tell me why css is not loading in jsp. I am not able to see background color.
file should be in src\main\webapp\resources\css\style.css by default resources folder is NOT under webapp.
Good Post
It is very good information for programmers who begin near days. Thanks big!
How to make it work .. Home Page works .. .but mapping to hello is not working … Even tried XML based also not able to get the mapping right … any wsy to debug where is the exact issue … Mapping to particular JSP view does not work for mw ..
@GetMapping(“/”)
public String hello(Model model) {
change the mapping in controller
place resource under the directory [webapp]
I am getting a problem regarding these code that HTTP Status 404 – /helloworld/
Thank you. it worked.
-Raj
Can you give solution for the below blog? Web module can be done by child developer. While dealing with EAR, facing lot of issues.
http://stackoverflow.com/questions/42818621/hibernate-configuration-from-ejb-module-returns-illegalstateexception-in-my-ear
the home page works , but mapping helloworld/hello is giving 404 error , i am using tomcat 8 and adding the server in eclipse and then choosing run on server .
any help where am i going wrong
Nice Tutorial
Nice tutorial, but when i hit the url “http://localhost:8080/springrest/customers” i’m getting “HTTP Status 404 – /springrest/customers”. Please help me in this.
Use Link=http://localhost:4040/helloworld/hello
I meant http://localhost:/helloworld/hello
Hello Viral,
This is very helpful tutorial. Thanks
Hi Viral,
I’m not able to load css and js in my similar project. Could you please help me?
Thanks so much.
Nice tutorial. Easy to understand..
Thanks for sharing this post about spring 4 MVC configuration
It doesn’t seem to be working without web.xml, there are two markers shown:
Description Resource Path Location Type
Cannot change version of project facet Dynamic Web Module to 3.0. HelloWorld line 1 Maven Java EE Configuration Problem
and
Description Resource Path Location Type
One or more constraints have not been satisfied. HelloWorld line 1 Maven Java EE Configuration Problem
Please comment.
I think I have found the solution:
https://stackoverflow.com/posts/21547854/revisions
http://localhost:8080/spring4/hello.
i am getting 404 error while downloading the project .
type Status report
message /spring4/hello.
description The requested resource is not available.
Thankyou for this usefull Tutorials
thoses paths were created by “maven”?