In this tutorial, we will try to write a small hello world program using Hibernate, MySQL and Maven. We will create a Java project using Maven and will then try to add Hibernate on it.
[sc name=”Hibernate_Tutorials”] Following are the tools and technologies used in this project.


 If you are getting this Hibernate Maven Repo error, then you need to define M2_REPO environment variable in eclipse pointing to your local maven repository. Goto Window > Preferences… > Java > Build Path > Classpath Variables > Define new variable M2_REPO pointing to your local maven repository.
 Once you will define this variable and rebuild the project, the above error will go.

7.1 Writing (Create) data in Hibernate Following is the code snippet that insert a row in database.
- Java JDK 5 or above
- Eclipse IDE 3.2 or above
- Maven 3.0 or above
- Hibernate 3.0 or above
- MySQL 5.0 or above
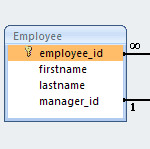
1. Database Creation
For this tutorial, we will create a simple table “employe” in MySQL. Use following script to create the table.CREATE TABLE `employee` (
`id` BIGINT(10) NOT NULL AUTO_INCREMENT,
`firstname` VARCHAR(50) NULL DEFAULT NULL,
`lastname` VARCHAR(50) NULL DEFAULT NULL,
`birth_date` DATE NOT NULL,
`cell_phone` VARCHAR(15) NOT NULL,
PRIMARY KEY (`id`)
)
COLLATE='latin1_swedish_ci'
ENGINE=InnoDB
ROW_FORMAT=DEFAULT
AUTO_INCREMENT=606
Code language: SQL (Structured Query Language) (sql)Connection URL: jdbc:mysql://localhost:3306/tutorial
DB Username: root
DB Password: <your mysql password>
Code language: JavaScript (javascript)2. Generate Maven Java project compatible with Eclipse
Open a command prompt and execute following code to generate a Maven Java project.mvn archetype:generate \
-DgroupId=net.viralpatel.hibernate \
-DartifactId=HibernateHelloWorldXML \
-DarchetypeArtifactId=maven-archetype-quickstart \
-DinteractiveMode=false
Code language: Java (java)Code language: Java (java)mvn eclipse:eclipse
3. Import project in Eclipse
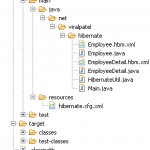
Open Eclipse and import the above Java project. File > Import… > General > Existing Projects into Workspace > Choose above Java project Once imported, the folder structure will look like following:
Important:
In case you get following error after importing project in Eclipse: If you are getting this Hibernate Maven Repo error, then you need to define M2_REPO environment variable in eclipse pointing to your local maven repository. Goto Window > Preferences… > Java > Build Path > Classpath Variables > Define new variable M2_REPO pointing to your local maven repository.
  Once you will define this variable and rebuild the project, the above error will go.
4. Add Hibernate Dependency to Maven pom.xml
Add following dependencies to Maven pom.xml.<project xmlns="http://maven.apache.org/POM/4.0.0" xmlns:xsi="http://www.w3.org/2001/XMLSchema-instance"
xsi:schemaLocation="http://maven.apache.org/POM/4.0.0 http://maven.apache.org/maven-v4_0_0.xsd">
<modelVersion>4.0.0</modelVersion>
<groupId>net.viralpatel.hibernate</groupId>
<artifactId>HibernateHelloWorldXML</artifactId>
<packaging>jar</packaging>
<version>1.0-SNAPSHOT</version>
<name>HibernateHelloWorldXML</name>
<url>http://maven.apache.org</url>
<dependencies>
<dependency>
<groupId>mysql</groupId>
<artifactId>mysql-connector-java</artifactId>
<version>5.1.10</version>
</dependency>
<dependency>
<groupId>org.hibernate</groupId>
<artifactId>hibernate</artifactId>
<version>3.2.6.ga</version>
</dependency>
<dependency>
<groupId>junit</groupId>
<artifactId>junit</artifactId>
<version>3.8.1</version>
<scope>test</scope>
</dependency>
</dependencies>
</project>
Code language: HTML, XML (xml)The above step is not mandatory. If you have Maven plugin for Eclipse installed in your IDE (Latest eclipse comes with this plugin built-in) you can just enable Maven dependencies by doing Right click on project > Maven > Enable Dependency Management.Code language: Java (java)mvn eclipse:eclipse
5. Add Hibernate Configuration XML
Now our project setup is ready. We will add following Hibernate configuration xml file in /src/main/resources folder. Note that this folder is not present in your project structure. Create a source folder: Right click on Project > New > Source Folder > Give folder name “/src/main/resources/” and click Finish. Copy following file in your project. File: /src/main/resources/hibernate.cfg.xml<?xml version='1.0' encoding='utf-8'?>
<!DOCTYPE hibernate-configuration PUBLIC
"-//Hibernate/Hibernate Configuration DTD 3.0//EN"
"http://hibernate.sourceforge.net/hibernate-configuration-3.0.dtd">
<hibernate-configuration>
<session-factory>
<!-- Database connection settings -->
<property name="connection.driver_class">com.mysql.jdbc.Driver</property>
<property name="connection.url">jdbc:mysql://localhost:3306/tutorial</property>
<property name="connection.username">root</property>
<property name="connection.password"></property>
<!-- JDBC connection pool (use the built-in) -->
<property name="connection.pool_size">1</property>
<!-- SQL dialect -->
<property name="dialect">org.hibernate.dialect.MySQLDialect</property>
<!-- Enable Hibernate's automatic session context management -->
<property name="current_session_context_class">thread</property>
<!-- Disable the second-level cache -->
<property name="cache.provider_class">org.hibernate.cache.NoCacheProvider</property>
<!-- Echo all executed SQL to stdout -->
<property name="show_sql">false</property>
<property name="hbm2ddl.auto">validate</property>
<mapping resource="net/viralpatel/hibernate/Employee.hbm.xml"/>
</session-factory>
</hibernate-configuration>
Code language: HTML, XML (xml)
6. Add Java source code
File: /src/main/java/net/viralpatel/hibernate/Employee.javapackage net.viralpatel.hibernate;
import java.sql.Date;
public class Employee {
private Long id;
private String firstname;
private String lastname;
private Date birthDate;
private String cellphone;
public Employee() {
}
public Employee(String firstname, String lastname, Date birthdate, String phone) {
this.firstname = firstname;
this.lastname = lastname;
this.birthDate = birthdate;
this.cellphone = phone;
}
// Getter and Setter methods
}
Code language: Java (java)package net.viralpatel.hibernate;
import org.hibernate.SessionFactory;
import org.hibernate.cfg.Configuration;
public class HibernateUtil {
private static final SessionFactory sessionFactory = buildSessionFactory();
private static SessionFactory buildSessionFactory() {
try {
// Create the SessionFactory from hibernate.cfg.xml
return new Configuration()
.configure()
.buildSessionFactory();
} catch (Throwable ex) {
System.err.println("Initial SessionFactory creation failed." + ex);
throw new ExceptionInInitializerError(ex);
}
}
public static SessionFactory getSessionFactory() {
return sessionFactory;
}
}
Code language: Java (java)<?xml version="1.0" encoding="UTF-8"?>
<!DOCTYPE hibernate-mapping PUBLIC
"-//Hibernate/Hibernate Mapping DTD 3.0//EN"
"http://hibernate.sourceforge.net/hibernate-mapping-3.0.dtd">
<hibernate-mapping package="net.viralpatel.hibernate">
<class name="Employee" table="EMPLOYEE">
<id name="id" column="ID">
<generator class="native"/>
</id>
<property name="firstname" />
<property name="lastname" column="lastname"/>
<property name="birthDate" type="date" column="birth_date"/>
<property name="cellphone" column="cell_phone"/>
</class>
</hibernate-mapping>
Code language: HTML, XML (xml)7. CRUD operations in Hibernate
Let us see the basic CRUD operation in Hibernate. We will use Employee table for this.7.1 Writing (Create) data in Hibernate Following is the code snippet that insert a row in database.private static Employee save(Employee employee) {
SessionFactory sf = HibernateUtil.getSessionFactory();
Session session = sf.openSession();
session.beginTransaction();
Long id = (Long) session.save(employee);
employee.setId(id);
session.getTransaction().commit();
session.close();
return employee;
}
...
...
...
// Call the save() method to insert a record in database.
System.out.println("******* WRITE *******");
Employee empl = new Employee("Jack", "Bauer", new Date(System.currentTimeMillis()), "911");
empl = save(empl);
Code language: Java (java)7.2 Reading (Read) data in Hibernate Below code snippet demos read functionality in Hibernate. Note that there are two methods one to list all the employees and other to read details about just one.private static List list() {
SessionFactory sf = HibernateUtil.getSessionFactory();
Session session = sf.openSession();
List employees = session.createQuery("from Employee").list();
session.close();
return employees;
}
private static Employee read(Long id) {
SessionFactory sf = HibernateUtil.getSessionFactory();
Session session = sf.openSession();
Employee employee = (Employee) session.get(Employee.class, id);
session.close();
return employee;
}
Code language: Java (java)7.3 Updating (Update) data in Hibernate Following is the code snippet to update a record in Hibernate.private static Employee update(Employee employee) {
SessionFactory sf = HibernateUtil.getSessionFactory();
Session session = sf.openSession();
session.beginTransaction();
session.merge(employee);
session.getTransaction().commit();
session.close();
return employee;
}
Code language: Java (java)7.4 Remove (Delete) data in Hibernate Following is code snippet to remove a record in Hibernate.private static void delete(Employee employee) {
SessionFactory sf = HibernateUtil.getSessionFactory();
Session session = sf.openSession();
session.beginTransaction();
session.delete(employee);
session.getTransaction().commit();
session.close();
}
Code language: Java (java)package net.viralpatel.hibernate;
import java.sql.Date;
import java.util.List;
import org.hibernate.Session;
import org.hibernate.SessionFactory;
public class Main {
public static void main(String[] args) {
// Read
System.out.println("******* READ *******");
List employees = list();
System.out.println("Total Employees: " + employees.size());
// Write
System.out.println("******* WRITE *******");
Employee empl = new Employee("Jack", "Bauer", new Date(System.currentTimeMillis()), "911");
empl = save(empl);
empl = read(empl.getId());
System.out.printf("%d %s %s \n", empl.getId(), empl.getFirstname(), empl.getLastname());
// Update
System.out.println("******* UPDATE *******");
Employee empl2 = read(1l); // read employee with id 1
System.out.println("Name Before Update:" + empl2.getFirstname());
empl2.setFirstname("James");
update(empl2); // save the updated employee details
empl2 = read(1l); // read again employee with id 1
System.out.println("Name Aftere Update:" + empl2.getFirstname());
// Delete
System.out.println("******* DELETE *******");
delete(empl);
Employee empl3 = read(empl.getId());
System.out.println("Object:" + empl3);
}
private static List list() {
SessionFactory sf = HibernateUtil.getSessionFactory();
Session session = sf.openSession();
List employees = session.createQuery("from Employee").list();
session.close();
return employees;
}
private static Employee read(Long id) {
SessionFactory sf = HibernateUtil.getSessionFactory();
Session session = sf.openSession();
Employee employee = (Employee) session.get(Employee.class, id);
session.close();
return employee;
}
private static Employee save(Employee employee) {
SessionFactory sf = HibernateUtil.getSessionFactory();
Session session = sf.openSession();
session.beginTransaction();
Long id = (Long) session.save(employee);
employee.setId(id);
session.getTransaction().commit();
session.close();
return employee;
}
private static Employee update(Employee employee) {
SessionFactory sf = HibernateUtil.getSessionFactory();
Session session = sf.openSession();
session.beginTransaction();
session.merge(employee);
session.getTransaction().commit();
session.close();
return employee;
}
private static void delete(Employee employee) {
SessionFactory sf = HibernateUtil.getSessionFactory();
Session session = sf.openSession();
session.beginTransaction();
session.delete(employee);
session.getTransaction().commit();
session.close();
}
}
Code language: Java (java)8. Final project structure
Once you have created all these source files, your project structure should look like following. Note that we have removed the default App.java and AppTest.java generated by Maven as we dont these files. 

9. Execute project
Execute the Main.java class and see output.******* READ *******
Total Employees: 200
******* WRITE *******
201 Jack Bauer
******* UPDATE *******
Name Before Update:Paula
Name Aftere Update:James
******* DELETE *******
Object:null
Code language: HTML, XML (xml)
That’s All Folks
Today we saw how to write our first Hibernate hello world example using XML Configuration. We used Maven to generate Java project and added Hibernate dependencies into it. Also we saw how to do different CRUD operations in Hibernate. Download Source
HibernateHelloWorldXML.zip (8 kb)
private static Employee save(Employee employee) {
SessionFactory sf = HibernateUtil.getSessionFactory();
Session session = sf.openSession();
session.beginTransaction();
Long id = (Long) session.save(employee);
employee.setId(id);
session.getTransaction().commit();
session.close();
return employee;
}
...
...
...
// Call the save() method to insert a record in database.
System.out.println("******* WRITE *******");
Employee empl = new Employee("Jack", "Bauer", new Date(System.currentTimeMillis()), "911");
empl = save(empl);
private static List list() {
	SessionFactory sf = HibernateUtil.getSessionFactory();
	Session session = sf.openSession();

	List employees = session.createQuery("from Employee").list();
	session.close();
	return employees;
}
private static Employee read(Long id) {
	SessionFactory sf = HibernateUtil.getSessionFactory();
	Session session = sf.openSession();

	Employee employee = (Employee) session.get(Employee.class, id);
	session.close();
	return employee;
}
Code language: Java (java)
7.3 Updating (Update) data in Hibernate Following is the code snippet to update a record in Hibernate.private static Employee update(Employee employee) {
SessionFactory sf = HibernateUtil.getSessionFactory();
Session session = sf.openSession();
session.beginTransaction();
session.merge(employee);
session.getTransaction().commit();
session.close();
return employee;
}
Code language: Java (java)7.4 Remove (Delete) data in Hibernate Following is code snippet to remove a record in Hibernate.private static void delete(Employee employee) {
SessionFactory sf = HibernateUtil.getSessionFactory();
Session session = sf.openSession();
session.beginTransaction();
session.delete(employee);
session.getTransaction().commit();
session.close();
}
Code language: Java (java)package net.viralpatel.hibernate;
import java.sql.Date;
import java.util.List;
import org.hibernate.Session;
import org.hibernate.SessionFactory;
public class Main {
public static void main(String[] args) {
// Read
System.out.println("******* READ *******");
List employees = list();
System.out.println("Total Employees: " + employees.size());
// Write
System.out.println("******* WRITE *******");
Employee empl = new Employee("Jack", "Bauer", new Date(System.currentTimeMillis()), "911");
empl = save(empl);
empl = read(empl.getId());
System.out.printf("%d %s %s \n", empl.getId(), empl.getFirstname(), empl.getLastname());
// Update
System.out.println("******* UPDATE *******");
Employee empl2 = read(1l); // read employee with id 1
System.out.println("Name Before Update:" + empl2.getFirstname());
empl2.setFirstname("James");
update(empl2); // save the updated employee details
empl2 = read(1l); // read again employee with id 1
System.out.println("Name Aftere Update:" + empl2.getFirstname());
// Delete
System.out.println("******* DELETE *******");
delete(empl);
Employee empl3 = read(empl.getId());
System.out.println("Object:" + empl3);
}
private static List list() {
SessionFactory sf = HibernateUtil.getSessionFactory();
Session session = sf.openSession();
List employees = session.createQuery("from Employee").list();
session.close();
return employees;
}
private static Employee read(Long id) {
SessionFactory sf = HibernateUtil.getSessionFactory();
Session session = sf.openSession();
Employee employee = (Employee) session.get(Employee.class, id);
session.close();
return employee;
}
private static Employee save(Employee employee) {
SessionFactory sf = HibernateUtil.getSessionFactory();
Session session = sf.openSession();
session.beginTransaction();
Long id = (Long) session.save(employee);
employee.setId(id);
session.getTransaction().commit();
session.close();
return employee;
}
private static Employee update(Employee employee) {
SessionFactory sf = HibernateUtil.getSessionFactory();
Session session = sf.openSession();
session.beginTransaction();
session.merge(employee);
session.getTransaction().commit();
session.close();
return employee;
}
private static void delete(Employee employee) {
SessionFactory sf = HibernateUtil.getSessionFactory();
Session session = sf.openSession();
session.beginTransaction();
session.delete(employee);
session.getTransaction().commit();
session.close();
}
}
Code language: Java (java)8. Final project structure
Once you have created all these source files, your project structure should look like following. Note that we have removed the default App.java and AppTest.java generated by Maven as we dont these files. 9. Execute project
Execute the Main.java class and see output.******* READ *******
Total Employees: 200
******* WRITE *******
201 Jack Bauer
******* UPDATE *******
Name Before Update:Paula
Name Aftere Update:James
******* DELETE *******
Object:null
Code language: HTML, XML (xml)
That’s All Folks
Today we saw how to write our first Hibernate hello world example using XML Configuration. We used Maven to generate Java project and added Hibernate dependencies into it. Also we saw how to do different CRUD operations in Hibernate. Download Source
HibernateHelloWorldXML.zip (8 kb)
private static Employee update(Employee employee) {
SessionFactory sf = HibernateUtil.getSessionFactory();
Session session = sf.openSession();
session.beginTransaction();
session.merge(employee);
session.getTransaction().commit();
session.close();
return employee;
}
private static void delete(Employee employee) {
	SessionFactory sf = HibernateUtil.getSessionFactory();
	Session session = sf.openSession();

	session.beginTransaction();

	session.delete(employee);

	session.getTransaction().commit();

	session.close();
}
Code language: Java (java)package net.viralpatel.hibernate;
import java.sql.Date;
import java.util.List;
import org.hibernate.Session;
import org.hibernate.SessionFactory;
public class Main {
public static void main(String[] args) {
// Read
System.out.println("******* READ *******");
List employees = list();
System.out.println("Total Employees: " + employees.size());
// Write
System.out.println("******* WRITE *******");
Employee empl = new Employee("Jack", "Bauer", new Date(System.currentTimeMillis()), "911");
empl = save(empl);
empl = read(empl.getId());
System.out.printf("%d %s %s \n", empl.getId(), empl.getFirstname(), empl.getLastname());
// Update
System.out.println("******* UPDATE *******");
Employee empl2 = read(1l); // read employee with id 1
System.out.println("Name Before Update:" + empl2.getFirstname());
empl2.setFirstname("James");
update(empl2); // save the updated employee details
empl2 = read(1l); // read again employee with id 1
System.out.println("Name Aftere Update:" + empl2.getFirstname());
// Delete
System.out.println("******* DELETE *******");
delete(empl);
Employee empl3 = read(empl.getId());
System.out.println("Object:" + empl3);
}
private static List list() {
SessionFactory sf = HibernateUtil.getSessionFactory();
Session session = sf.openSession();
List employees = session.createQuery("from Employee").list();
session.close();
return employees;
}
private static Employee read(Long id) {
SessionFactory sf = HibernateUtil.getSessionFactory();
Session session = sf.openSession();
Employee employee = (Employee) session.get(Employee.class, id);
session.close();
return employee;
}
private static Employee save(Employee employee) {
SessionFactory sf = HibernateUtil.getSessionFactory();
Session session = sf.openSession();
session.beginTransaction();
Long id = (Long) session.save(employee);
employee.setId(id);
session.getTransaction().commit();
session.close();
return employee;
}
private static Employee update(Employee employee) {
SessionFactory sf = HibernateUtil.getSessionFactory();
Session session = sf.openSession();
session.beginTransaction();
session.merge(employee);
session.getTransaction().commit();
session.close();
return employee;
}
private static void delete(Employee employee) {
SessionFactory sf = HibernateUtil.getSessionFactory();
Session session = sf.openSession();
session.beginTransaction();
session.delete(employee);
session.getTransaction().commit();
session.close();
}
}
Code language: Java (java)8. Final project structure
Once you have created all these source files, your project structure should look like following. Note that we have removed the default App.java and AppTest.java generated by Maven as we dont these files.
9. Execute project
Execute the Main.java class and see output.Code language: HTML, XML (xml)******* READ ******* Total Employees: 200 ******* WRITE ******* 201 Jack Bauer ******* UPDATE ******* Name Before Update:Paula Name Aftere Update:James ******* DELETE ******* Object:null

I’m getting this error – any ideas why?
The import org.hibernate.Session cannot be resolved
Hi Tom, check if your maven dependencies are properly resolved. It seems that hibernate jar file is not resolved.
hi TOm,
I doing same u, but I cannot run project.
help me check it, thanks
error:
May 07, 2014 3:22:12 PM org.hibernate.cfg.Environment
INFO: Hibernate 3.2.3
May 07, 2014 3:22:12 PM org.hibernate.cfg.Environment
INFO: hibernate.properties not found
May 07, 2014 3:22:12 PM org.hibernate.cfg.Environment buildBytecodeProvider
INFO: Bytecode provider name : cglib
May 07, 2014 3:22:12 PM org.hibernate.cfg.Environment
INFO: using JDK 1.4 java.sql.Timestamp handling
May 07, 2014 3:22:12 PM org.hibernate.cfg.Configuration configure
INFO: configuring from resource: /hibernate.cfg.xml
May 07, 2014 3:22:12 PM org.hibernate.cfg.Configuration getConfigurationInputStream
INFO: Configuration resource: /hibernate.cfg.xml
Exception in thread “main” org.hibernate.HibernateException: /hibernate.cfg.xml not found
at org.hibernate.util.ConfigHelper.getResourceAsStream(ConfigHelper.java:147)
at org.hibernate.cfg.Configuration.getConfigurationInputStream(Configuration.java:1405)
at org.hibernate.cfg.Configuration.configure(Configuration.java:1427)
at org.hibernate.cfg.Configuration.configure(Configuration.java:1414)
at net.example.App.main(App.java:18)
Hi Viral
Seems I resolved the maven dependencies but im now getting the following errors:
– The method setFirstname(String) is undefined for the type Employee
– The method openSession() is undefined for the type SessionFactory
– The method setId(Long) is undefined for the type Employee
Hi Tom I also faced this problem. Just need to see hibernate.cfg.xml & Employee.hbm.xml file. it should be configured properly. I just correct this one & working fine
Can you post the amendments you made to get it working?
Hi Viral thanks for this tutorial. I got the output . I am not using Mavan. its just a simple read,Update, & delete Data from database.
Okay got this working now – Don’t think I had the correct path set for the M2_REPO it should be ~/.M2 for linux but now i’m getting a Null Pointer exception on the delete function.
Total Employees: 1
******* WRITE *******
607 Jack Bauer
******* UPDATE *******
Exception in thread “main” java.lang.NullPointerException
at net.viralpatel.hibernate.Main.main(Main.java:33)
I think the reason you’re getting this exception is that the auto-increment property for the SQL at the top of the tutorial is set as 606 (hence when the record is created, a value of 607 is assigned for the ‘ID’ as opposed to 1). Try re-creating the table with an auto-increment value of 0 for the ‘create table’ statement instead.
I am Getting below error:
: org.apache.maven.archetype.old.ArchetypeTemplateProcessingException: Una
t as it is not of packaging type ‘pom’
Unable to add module to the current project as it is not of packaging type ‘pom’
hello…….i prepared a simple java project using eclipse hibernate nd it was successfully run on eclipse but i want to see output on command form. using mysql database then which command i use ?????????????
Thanks for the amazing tutorial .. Absolutely amazing .. Everything is explained clearly.
This tutorial has a slight mistake.
Employee.hbm.xml is placed in package net.viralpate.hibernate which is wrong.
This Employee.hbm.xml must be placed in the src/main/resources folder.
Comments/Suggestions on the above posted by me……..
Fantastic tutorials. Very straightforward and clear. Thanks so much!
Viral
It’s good. Also it is very easy to understand
I found the error when execute the program, please advise and step for resolve. Thanks
錯誤: 找不到或無法載入主要類別 org.apache.catalina.startup.Bootstrap
Thanks Viral,
Good Tutorial, works like a charm
Joe,
small mistake in the tutorial
employee.hbm.xml file should be under resources folder…good tutorial thanks a lot
Works perfec…cheerz..!
i am getting the error “could not find or load the main class”… what should i do?
Just went through your tutorial. It is so thorough. Loved it.
Thanks!
Nice tutorial. One issue I experienced was a null pointer being generated.
It is caused by the auto increment of the table starting at id 606 but we try to load the employee with id 1.
Great tutorial! Just one hiccup was not finding the mappings Employee.hbm.xml as it was not in the resources.. Moved to resources and worked perfect! I tried to search this question I have but didn’t find exact answers online – any idea why do we have to have getters and setters here? I didn’t have any initially but the build kept failing and had to add them all for the Employee class..
Sir ,
I am trying to implement second level cache in Hibernate and i am getting errors , will you please send me one example to implement the second level cache. I have confusions about which jar fie to be used for implementing it .
Please sir help me out and that will be your most kindness.
Regards
Asraar
Hi There,
I got an error, do you have any idea why i got it, pls advise me.
Thank you very much for advance.
Here is error.
[ERROR] Failed to execute goal on project HibernateHelloWorldXML: Could not resolve dependencies for project net.viralpatel.hibernate:HibernateHelloWorldXML:jar:1.0-SNAPSHOT: Failure to find javax.transaction:jta:jar:1.0.1B in http://repo.maven.apache.org/maven2 was cached in the local repository, resolution will not be reattempted until the update interval of central has elapsed or updates are forced -> [Help 1]
Thanks for the very good tutorial!
For error : [ERROR] Failed to execute goal on project HibernateHelloWorldXML: Could not resolve dependencies for project net.viralpatel.hibernate:HibernateHelloWorldXML:jar:1.0-SNAPSHOT: Failure to find javax.transaction:jta:jar:1.0.1B in http://repo.maven.apache.org/maven2 was cached in the local repository, resolution will not be reattempted until the update interval of central has elapsed or updates are forced -> [Help 1]
Please add below entry in your pom file
java.net
http://download.java.net/maven/2/
hi I would like to ask on how to auto increment my ID property value in hibernate java. I don’t want my user enter his/her ID value please help me.
Hi, can you see my related problem in StackExchange?
http://stackoverflow.com/questions/23364662/how-can-i-catch-password-error-from-configuration-buildsessionfactory-psql
nice example
Hi Viral
Thanks for such a great Tutorial.
I am using Postgres instead of mysql could you please tell me what changes i need to do in CREATE TABLE query as auto increment doesn’t work ,and in ID mapping in employee.hbm.xml
Your tutorial is fine.
But each time i need to scroll up click on next topic.
so better keep navigation buttons like [previous] and [next] on top and bottom.
Hi Viral,
I am trying tutorial, it gives me below error.
********** READ ************
SLF4J: The requested version 1.6.99 by your slf4j binding is not compatible with [1.5.5, 1.5.6, 1.5.7, 1.5.8]
SLF4J: See http://www.slf4j.org/codes.html#version_mismatch for further details.
SLF4J: Class path contains multiple SLF4J bindings.
SLF4J: Found binding in [jar:file:/C:/Users/aaa/Desktop/Personal/Java%20Training/Hibernate/slf4j-1.7.7/slf4j-1.7.7/slf4j-log4j12-1.7.7.jar!/org/slf4j/impl/StaticLoggerBinder.class]
SLF4J: Found binding in [jar:file:/C:/Users/aaa/.m2/repository/org/slf4j/slf4j-log4j12/1.7.7/slf4j-log4j12-1.7.7.jar!/org/slf4j/impl/StaticLoggerBinder.class]
SLF4J: See http://www.slf4j.org/codes.html#multiple_bindings for an explanation.
log4j:WARN No appenders could be found for logger (org.hibernate.cfg.Environment).
log4j:WARN Please initialize the log4j system properly.
log4j:WARN See http://logging.apache.org/log4j/1.2/faq.html#noconfig for more info.
Exception in thread “main” org.hibernate.exception.GenericJDBCException: Cannot open connection
at org.hibernate.exception.SQLStateConverter.handledNonSpecificException(SQLStateConverter.java:140)
at org.hibernate.exception.SQLStateConverter.convert(SQLStateConverter.java:128)
at org.hibernate.exception.JDBCExceptionHelper.convert(JDBCExceptionHelper.java:66)
at org.hibernate.exception.JDBCExceptionHelper.convert(JDBCExceptionHelper.java:52)
at org.hibernate.jdbc.ConnectionManager.openConnection(ConnectionManager.java:449)
at org.hibernate.jdbc.ConnectionManager.getConnection(ConnectionManager.java:167)
at org.hibernate.jdbc.AbstractBatcher.prepareQueryStatement(AbstractBatcher.java:161)
at org.hibernate.loader.Loader.prepareQueryStatement(Loader.java:1616)
at org.hibernate.loader.Loader.doQuery(Loader.java:717)
at org.hibernate.loader.Loader.doQueryAndInitializeNonLazyCollections(Loader.java:270)
at org.hibernate.loader.Loader.doList(Loader.java:2449)
at org.hibernate.loader.Loader.listIgnoreQueryCache(Loader.java:2192)
at org.hibernate.loader.Loader.list(Loader.java:2187)
at org.hibernate.loader.hql.QueryLoader.list(QueryLoader.java:452)
at org.hibernate.hql.ast.QueryTranslatorImpl.list(QueryTranslatorImpl.java:363)
at org.hibernate.engine.query.HQLQueryPlan.performList(HQLQueryPlan.java:196)
at org.hibernate.impl.SessionImpl.list(SessionImpl.java:1258)
at org.hibernate.impl.QueryImpl.list(QueryImpl.java:102)
Caused by: java.sql.SQLException: Access denied for user ‘admin’@’localhost’ (using password: NO)
at com.mysql.jdbc.SQLError.createSQLException(SQLError.java:996)
regards,
Tek
Hi
Thanks for your post, here is the sample sql script which I want to load using jpa entitymanager :
INSERT INTO `emp1` (`id`, `fname`, `lname`, `age`, `dob`) VALUES (‘1’, ‘senthil’, ‘kumar’, ’12’, ‘2001-01-01 12:00:00’);
INSERT INTO `emp1` (`id`, `fname`, `lname`, `age`, `dob`) VALUES (‘2’, ‘srikanth’, ‘g’, ’21’, ‘2001-01-01 12:00:00’);
INSERT INTO `emp1` (`id`, `fname`, `lname`, `age`, `dob`) VALUES (‘3’, ‘arun’, ‘p’, ’33’, ‘2011-04-04 12:00:00’);
INSERT INTO `emp1` (`id`, `fname`, `lname`, `age`, `dob`) VALUES (‘4’, ‘basker’, ‘P’, ’12’, ‘2011-03-03 12:00:00’);
INSERT INTO `payroll1` (`pid`, `eid`, `salary`) VALUES (‘1’, ‘1’, ‘10000000.0000’);
INSERT INTO `payroll1` (`pid`, `eid`, `salary`) VALUES (‘2’, ‘2’, ‘222222222.0000’);
INSERT INTO `payroll1` (`pid`, `eid`, `salary`) VALUES (‘3’, ‘3’, ‘333333333.0000’);
INSERT INTO `payroll1` (`pid`, `eid`, `salary`) VALUES (‘4’, ‘4’, ‘44444444444.0000’);
INSERT INTO `payroll1` (`pid`, `eid`, `salary`) VALUES (‘5’, ‘1’, ‘4444444444.0000’);
but I get the exception from hibernate
Hibernate: BEGIN
INSERT INTO `emp1` (`id`, `fname`, `lname`, `age`, `dob`) VALUES (‘1’, ‘senthil’, ‘kumar’, ’12’, ‘2001-01-01 12:00:00’);
INSERT INTO `emp1` (`id`, `fname`, `lname`, `age`, `dob`) VALUES (‘2’, ‘srikanth’, ‘g’, ’21’, ‘2001-01-01 12:00:00’);
INSERT INTO `emp1` (`id`, `fname`, `lname`, `age`, `dob`) VALUES (‘3’, ‘arun’, ‘p’, ’33’, ‘2011-04-04 12:00:00’);
INSERT INTO `emp1` (`id`, `fname`, `lname`, `age`, `dob`) VALUES (‘4’, ‘basker’, ‘P’, ’12’, ‘2011-03-03 12:00:00’);
INSERT INTO `payroll1` (`pid`, `eid`, `salary`) VALUES (‘1’, ‘1’, ‘10000000.0000’);
INSERT INTO `payroll1` (`pid`, `eid`, `salary`) VALUES (‘2’, ‘2’, ‘222222222.0000’);
INSERT INTO `payroll1` (`pid`, `eid`, `salary`) VALUES (‘3’, ‘3’, ‘333333333.0000’);
INSERT INTO `payroll1` (`pid`, `eid`, `salary`) VALUES (‘4’, ‘4’, ‘44444444444.0000’);
INSERT INTO `payroll1` (`pid`, `eid`, `salary`) VALUES (‘5’, ‘1’, ‘4444444444.0000’);
END;
17 Oct, 2014 10:47:02 AM org.hibernate.util.JDBCExceptionReporter logExceptions
WARNING: SQL Error: 1064, SQLState: 42000
17 Oct, 2014 10:47:02 AM org.hibernate.util.JDBCExceptionReporter logExceptions
SEVERE: You have an error in your SQL syntax; check the manual that corresponds to your MySQL server version for the right syntax to use near ‘INSERT INTO `emp1` (`id`, `fname`, `lname`, `age`, `dob`) VALUES (‘1’, ‘senthil” at line 2
Exception in thread “main” javax.persistence.PersistenceException: org.hibernate.exception.SQLGrammarException: could not execute native bulk manipulation query
at org.hibernate.ejb.AbstractEntityManagerImpl.convert(AbstractEntityManagerImpl.java:1235)
at org.hibernate.ejb.AbstractEntityManagerImpl.convert(AbstractEntityManagerImpl.java:1168)
at org.hibernate.ejb.AbstractEntityManagerImpl.throwPersistenceException(AbstractEntityManagerImpl.java:1245)
at org.hibernate.ejb.AbstractQueryImpl.executeUpdate(AbstractQueryImpl.java:108)
at com.plausiblelabs.mdb.Main.main(Main.java:74)
Caused by: org.hibernate.exception.SQLGrammarException: could not execute native bulk manipulation query
at org.hibernate.exception.SQLStateConverter.convert(SQLStateConverter.java:92)
at org.hibernate.exception.JDBCExceptionHelper.convert(JDBCExceptionHelper.java:66)
at org.hibernate.engine.query.NativeSQLQueryPlan.performExecuteUpdate(NativeSQLQueryPlan.java:219)
at org.hibernate.impl.SessionImpl.executeNativeUpdate(SessionImpl.java:1300)
at org.hibernate.impl.SQLQueryImpl.executeUpdate(SQLQueryImpl.java:365)
at org.hibernate.ejb.QueryImpl.internalExecuteUpdate(QueryImpl.java:183)
at org.hibernate.ejb.AbstractQueryImpl.executeUpdate(AbstractQueryImpl.java:99)
… 1 more
Caused by: com.mysql.jdbc.exceptions.jdbc4.MySQLSyntaxErrorException: You have an error in your SQL syntax; check the manual that corresponds to your MySQL server version for the right syntax to use near ‘INSERT INTO `emp1` (`id`, `fname`, `lname`, `age`, `dob`) VALUES (‘1’, ‘senthil” at line 2
at sun.reflect.NativeConstructorAccessorImpl.newInstance0(Native Method)
at sun.reflect.NativeConstructorAccessorImpl.newInstance(NativeConstructorAccessorImpl.java:57)
at sun.reflect.DelegatingConstructorAccessorImpl.newInstance(DelegatingConstructorAccessorImpl.java:45)
at java.lang.reflect.Constructor.newInstance(Constructor.java:534)
at com.mysql.jdbc.Util.handleNewInstance(Util.java:408)
at com.mysql.jdbc.Util.getInstance(Util.java:383)
at com.mysql.jdbc.SQLError.createSQLException(SQLError.java:1062)
at com.mysql.jdbc.MysqlIO.checkErrorPacket(MysqlIO.java:4208)
at com.mysql.jdbc.MysqlIO.checkErrorPacket(MysqlIO.java:4140)
at com.mysql.jdbc.MysqlIO.sendCommand(MysqlIO.java:2597)
at com.mysql.jdbc.MysqlIO.sqlQueryDirect(MysqlIO.java:2758)
at com.mysql.jdbc.ConnectionImpl.execSQL(ConnectionImpl.java:2826)
at com.mysql.jdbc.PreparedStatement.executeInternal(PreparedStatement.java:2082)
at com.mysql.jdbc.PreparedStatement.executeUpdate(PreparedStatement.java:2334)
at com.mysql.jdbc.PreparedStatement.executeUpdate(PreparedStatement.java:2262)
at com.mysql.jdbc.PreparedStatement.executeUpdate(PreparedStatement.java:2246)
at org.hibernate.engine.query.NativeSQLQueryPlan.performExecuteUpdate(NativeSQLQueryPlan.java:210)
… 5 more
Java Result: 1
The java code is :
Query q = em.createNativeQuery(“BEGIN \n”+temp + “\nEND;”);
q.executeUpdate();
Please lemme know what have done wrong
REgards
Sentil
nice simple and easy way
very help this link
Respected sir
i have a program in hibernate and spring to registration form program that is have problem
log4j:WARN See http://logging.apache.org/log4j/1.2/faq.html#noconfig for more info.
Hibernate: select user0_.id as id0_, user0_.Address as Address0_, user0_.email as email0_, user0_.firstName as firstName0_, user0_.lastName as lastName0_, user0_.middleName as middleName0_, user0_.password as password0_, user0_.userId as userId0_ from NDMA_TABLE user0_ where user0_.userId=’aa’
Hibernate: insert into NDMA_TABLE (Address, email, firstName, lastName, middleName, password, userId) values (?, ?, ?, ?, ?, ?, ?)
org.hibernate.exception.SQLGrammarException: could not insert: [com.saurabh.model.User]
at org.hibernate.exception.SQLStateConverter.convert(SQLStateConverter.java:92)
at org.hibernate.exception.JDBCExceptionHelper.convert(JDBCExceptionHelper.java:66)
at org.hibernate.id.insert.AbstractReturningDelegate.performInsert(AbstractReturningDelegate.java:64)
at org.hibernate.persister.entity.AbstractEntityPersister.insert(AbstractEntityPersister.java:2345)
at org.hibernate.persister.entity.AbstractEntityPersister.insert(AbstractEntityPersister.java:2852)
at org.hibernate.action.EntityIdentityInsertAction.execute(EntityIdentityInsertAction.java:71)
at org.hibernate.engine.ActionQueue.execute(ActionQueue.java:273)
at org.hibernate.event.def.AbstractSaveEventListener.performSaveOrReplicate(AbstractSaveEventListener.java:320)
at org.hibernate.event.def.AbstractSaveEventListener.performSave(AbstractSaveEventListener.java:203)
at org.hibernate.event.def.AbstractSaveEventListener.saveWithGeneratedId(AbstractSaveEventListener.java:129)
at org.hibernate.event.def.DefaultSaveOrUpdateEventListener.saveWithGeneratedOrRequestedId(DefaultSaveOrUpdateEventListener.java:210)
at org.hibernate.event.def.DefaultSaveOrUpdateEventListener.entityIsTransient(DefaultSaveOrUpdateEventListener.java:195)
at org.hibernate.event.def.DefaultSaveOrUpdateEventListener.performSaveOrUpdate(DefaultSaveOrUpdateEventListener.java:117)
at org.hibernate.event.def.DefaultSaveOrUpdateEventListener.onSaveOrUpdate(DefaultSaveOrUpdateEventListener.java:93)
at org.hibernate.impl.SessionImpl.fireSaveOrUpdate(SessionImpl.java:685)
at org.hibernate.impl.SessionImpl.saveOrUpdate(SessionImpl.java:677)
at org.hibernate.impl.SessionImpl.saveOrUpdate(SessionImpl.java:673)
at com.saurabh.service.RegisterService.register(RegisterService.java:20)
at com.saurabh.controller.RegisterServlet.doPost(RegisterServlet.java:30)
at javax.servlet.http.HttpServlet.service(HttpServlet.java:650)
at javax.servlet.http.HttpServlet.service(HttpServlet.java:731)
at org.apache.catalina.core.ApplicationFilterChain.internalDoFilter(ApplicationFilterChain.java:303)
at org.apache.catalina.core.ApplicationFilterChain.doFilter(ApplicationFilterChain.java:208)
at org.apache.tomcat.websocket.server.WsFilter.doFilter(WsFilter.java:52)
at org.apache.catalina.core.ApplicationFilterChain.internalDoFilter(ApplicationFilterChain.java:241)
at org.apache.catalina.core.ApplicationFilterChain.doFilter(ApplicationFilterChain.java:208)
at org.apache.catalina.core.StandardWrapperValve.invoke(StandardWrapperValve.java:218)
at org.apache.catalina.core.StandardContextValve.invoke(StandardContextValve.java:122)
at org.apache.catalina.authenticator.AuthenticatorBase.invoke(AuthenticatorBase.java:505)
at org.apache.catalina.core.StandardHostValve.invoke(StandardHostValve.java:169)
at org.apache.catalina.valves.ErrorReportValve.invoke(ErrorReportValve.java:103)
at org.apache.catalina.valves.AccessLogValve.invoke(AccessLogValve.java:956)
at org.apache.catalina.core.StandardEngineValve.invoke(StandardEngineValve.java:116)
at org.apache.catalina.connector.CoyoteAdapter.service(CoyoteAdapter.java:442)
at org.apache.coyote.http11.AbstractHttp11Processor.process(AbstractHttp11Processor.java:1082)
at org.apache.coyote.AbstractProtocol$AbstractConnectionHandler.process(AbstractProtocol.java:623)
at org.apache.tomcat.util.net.JIoEndpoint$SocketProcessor.run(JIoEndpoint.java:316)
at java.util.concurrent.ThreadPoolExecutor.runWorker(Unknown Source)
at java.util.concurrent.ThreadPoolExecutor$Worker.run(Unknown Source)
at org.apache.tomcat.util.threads.TaskThread$WrappingRunnable.run(TaskThread.java:61)
at java.lang.Thread.run(Unknown Source)
Caused by: com.mysql.jdbc.exceptions.jdbc4.MySQLSyntaxErrorException: Unknown column ‘password’ in ‘field list’
at sun.reflect.NativeConstructorAccessorImpl.newInstance0(Native Method)
at sun.reflect.NativeConstructorAccessorImpl.newInstance(Unknown Source)
at sun.reflect.DelegatingConstructorAccessorImpl.newInstance(Unknown Source)
at java.lang.reflect.Constructor.newInstance(Unknown Source)
at com.mysql.jdbc.Util.handleNewInstance(Util.java:411)
at com.mysql.jdbc.Util.getInstance(Util.java:386)
at com.mysql.jdbc.SQLError.createSQLException(SQLError.java:1052)
at com.mysql.jdbc.MysqlIO.checkErrorPacket(MysqlIO.java:4096)
at com.mysql.jdbc.MysqlIO.checkErrorPacket(MysqlIO.java:4028)
at com.mysql.jdbc.MysqlIO.sendCommand(MysqlIO.java:2490)
at com.mysql.jdbc.MysqlIO.sqlQueryDirect(MysqlIO.java:2651)
at com.mysql.jdbc.ConnectionImpl.execSQL(ConnectionImpl.java:2683)
at com.mysql.jdbc.PreparedStatement.executeInternal(PreparedStatement.java:2144)
at com.mysql.jdbc.PreparedStatement.executeUpdate(PreparedStatement.java:2444)
at com.mysql.jdbc.PreparedStatement.executeUpdate(PreparedStatement.java:2362)
at com.mysql.jdbc.PreparedStatement.executeUpdate(PreparedStatement.java:2347)
at org.hibernate.id.IdentityGenerator$GetGeneratedKeysDelegate.executeAndExtract(IdentityGenerator.java:94)
at org.hibernate.id.insert.AbstractReturningDelegate.performInsert(AbstractReturningDelegate.java:57)
… 38 more